By: Team M11-3 Since: Jan 2019 Licence: MIT
- 1. Setting up
- 2. Design
- 3. Implementation
- 4. Documentation
- 5. Testing
- 6. Dev Ops
- Appendix A: Suggested Programming Tasks to Get Started
- Appendix B: Product Scope
- Appendix C: User Stories
- Appendix D: Use Cases
- Appendix E: Non Functional Requirements
- Appendix F: Glossary
- Appendix G: Product Survey
- Appendix H: Instructions for Manual Testing
1. Setting up
1.1. Prerequisites
The following are some prerequisites required:
-
JDK
9or laterJDK 10on Windows will fail to run tests in headless mode due to a JavaFX bug. Windows developers are highly recommended to use JDK9. -
IntelliJ IDE
IntelliJ by default has Gradle and JavaFx plugins installed.
Do not disable them. If you have disabled them, go toFile>Settings>Pluginsto re-enable them.
1.2. Setting up the project in your computer
Follow the steps below to set up the project:
-
Fork this repo, and clone the fork to your computer
-
Open IntelliJ (if you are not in the welcome screen, click
File>Close Projectto close the existing project dialog first) -
Set up the correct JDK version for Gradle
-
Click
Configure>Project Defaults>Project Structure -
Click
New…and find the directory of the JDK
-
-
Click
Import Project -
Locate the
build.gradlefile and select it. ClickOK -
Click
Open as Project -
Click
OKto accept the default settings -
Open a console and run the command
gradlew processResources(Mac/Linux:./gradlew processResources). It should finish with theBUILD SUCCESSFULmessage.
This will generate all resources required by the application and tests. -
Open
MainWindow.javaand check for any code errors-
Due to an ongoing issue with some of the newer versions of IntelliJ, code errors may be detected even if the project can be built and run successfully
-
To resolve this, place your cursor over any of the code section highlighted in red. Press ALT+ENTER, and select
Add '--add-modules=…' to module compiler optionsfor each error
-
-
Repeat this for the test folder as well (e.g. check
HelpWindowTest.javafor code errors, and if so, resolve it the same way)
1.3. Verifying the setup
Follow the steps below to verify the setup:
-
Run the
seedu.address.MainAppand try a few commands -
Run the tests to ensure they all pass.
1.4. Configurations to do before writing code
1.4.1. Configuring the coding style
This project follows oss-generic coding standards. IntelliJ’s default style is mostly compliant with ours but it uses a different import order from ours. To rectify,
-
Go to
File>Settings…(Windows/Linux), orIntelliJ IDEA>Preferences…(macOS) -
Select
Editor>Code Style>Java -
Click on the
Importstab to set the order-
For
Class count to use import with '*'andNames count to use static import with '*': Set to999to prevent IntelliJ from contracting the import statements -
For
Import Layout: The order isimport static all other imports,import java.*,import javax.*,import org.*,import com.*,import all other imports. Add a<blank line>between eachimport
-
Optionally, you can follow the UsingCheckstyle.adoc document to configure Intellij to check style-compliance as you write code.
1.4.2. Updating documentation to match your fork
After forking the repo, the documentation will still have the SE-EDU branding and refer to the se-edu/addressbook-level4 repo.
If you plan to develop this fork as a separate product (i.e. instead of contributing to se-edu/addressbook-level4), you should do the following:
-
Configure the site-wide documentation settings in
build.gradle, such as thesite-name, to suit your own project. -
Replace the URL in the attribute
repoURLinDeveloperGuide.adocandUserGuide.adocwith the URL of your fork.
1.4.3. Setting up CI
Set up Travis to perform Continuous Integration (CI) for your fork. See UsingTravis.adoc to learn how to set it up.
After setting up Travis, you can optionally set up coverage reporting for your team fork (see UsingCoveralls.adoc).
| Coverage reporting could be useful for a team repository that hosts the final version but it is not that useful for your personal fork. |
Optionally, you can set up AppVeyor as a second CI (see UsingAppVeyor.adoc).
| Having both Travis and AppVeyor ensures your App works on both Unix-based platforms and Windows-based platforms (Travis is Unix-based and AppVeyor is Windows-based) |
1.4.4. Getting started with coding
When you are ready to start coding,
-
Get some sense of the overall design by reading Section 2.1, “Architecture”.
-
Take a look at Appendix A, Suggested Programming Tasks to Get Started.
2. Design
2.1. Architecture
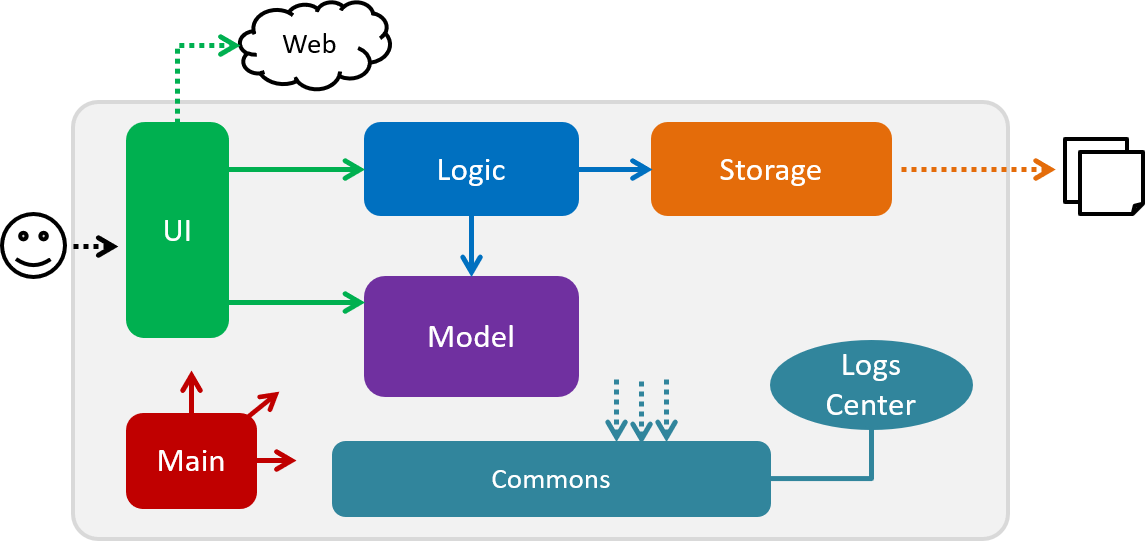
The Architecture Diagram given above explains the high-level design of the App. Given below is a quick overview of each component.
The .pptx files used to create diagrams in this document can be found in the diagrams folder. To update a diagram, modify the diagram in the pptx file, select the objects of the diagram, and choose Save as picture.
|
Main has only one class called MainApp. It is responsible for,
-
At app launch: Initializes the components in the correct sequence, and connects them up with each other.
-
At shut down: Shuts down the components and invokes cleanup method where necessary.
Commons represents a collection of classes used by multiple other components.
The following class plays an important role at the architecture level:
-
LogsCenter: Used by many classes to write log messages to the App’s log file.
The rest of the App consists of four components.
Each of the four components
-
Defines its API in an
interfacewith the same name as the Component. -
Exposes its functionality using a
{Component Name}Managerclass.
For example, the Logic component (see the class diagram given below) defines it’s API in the Logic.java interface and exposes its functionality using the LogicManager.java class.
How the architecture components interact with each other
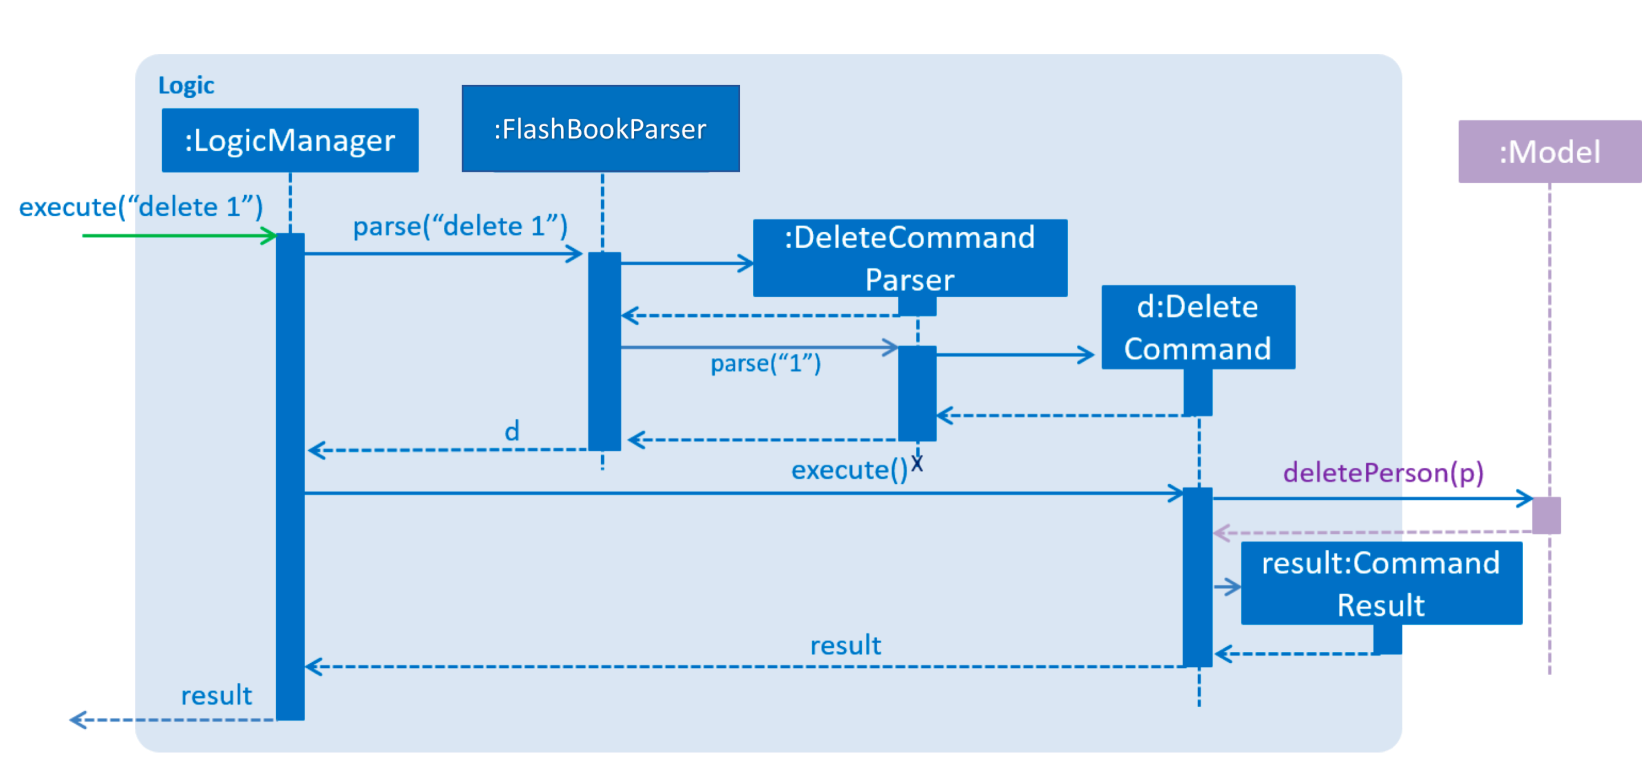
The Sequence Diagram below shows how the components interact with each other for the scenario where the user issues the command delete 1.
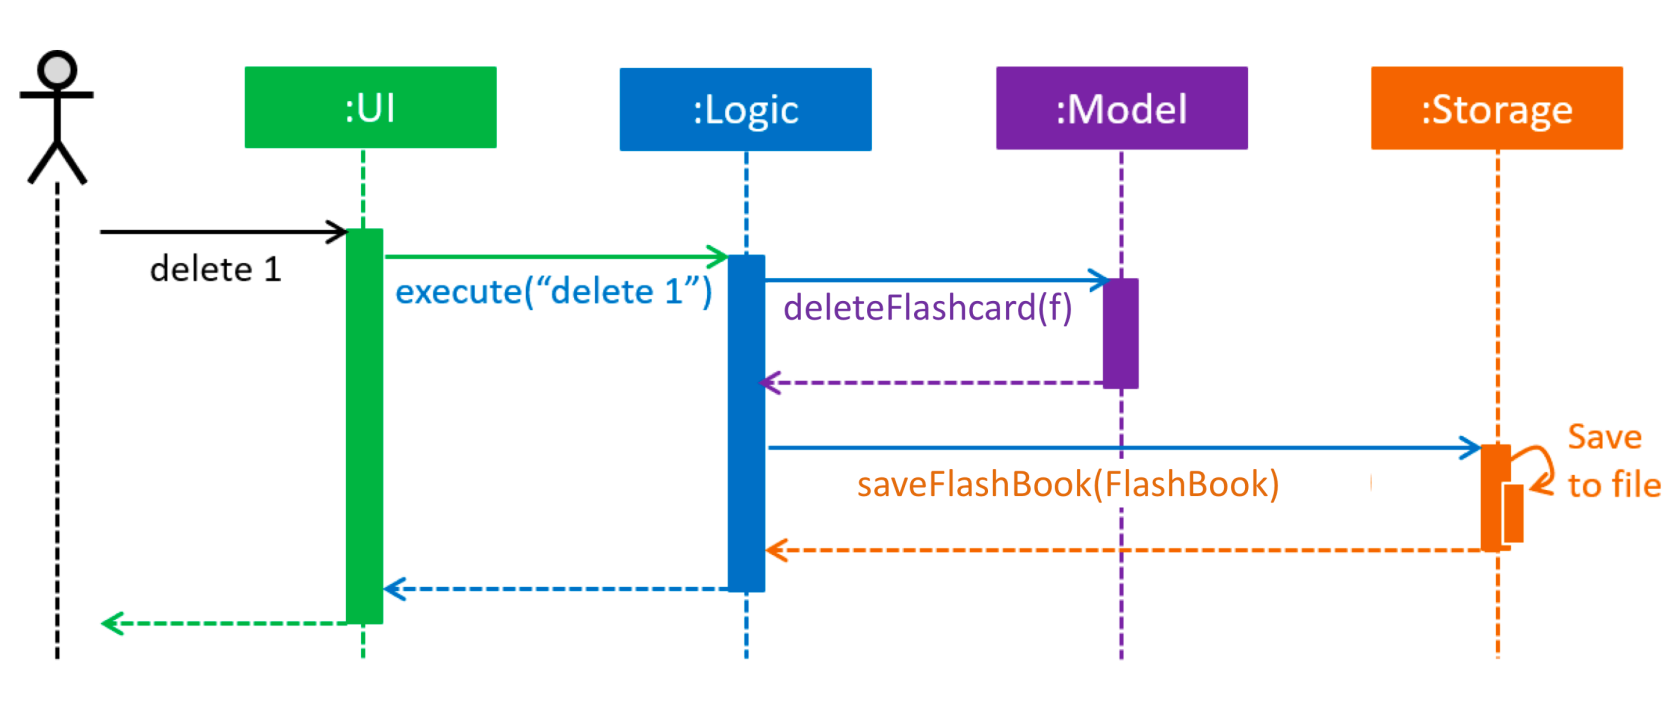
delete 1 command (part 1)The sections below give more details of each component.
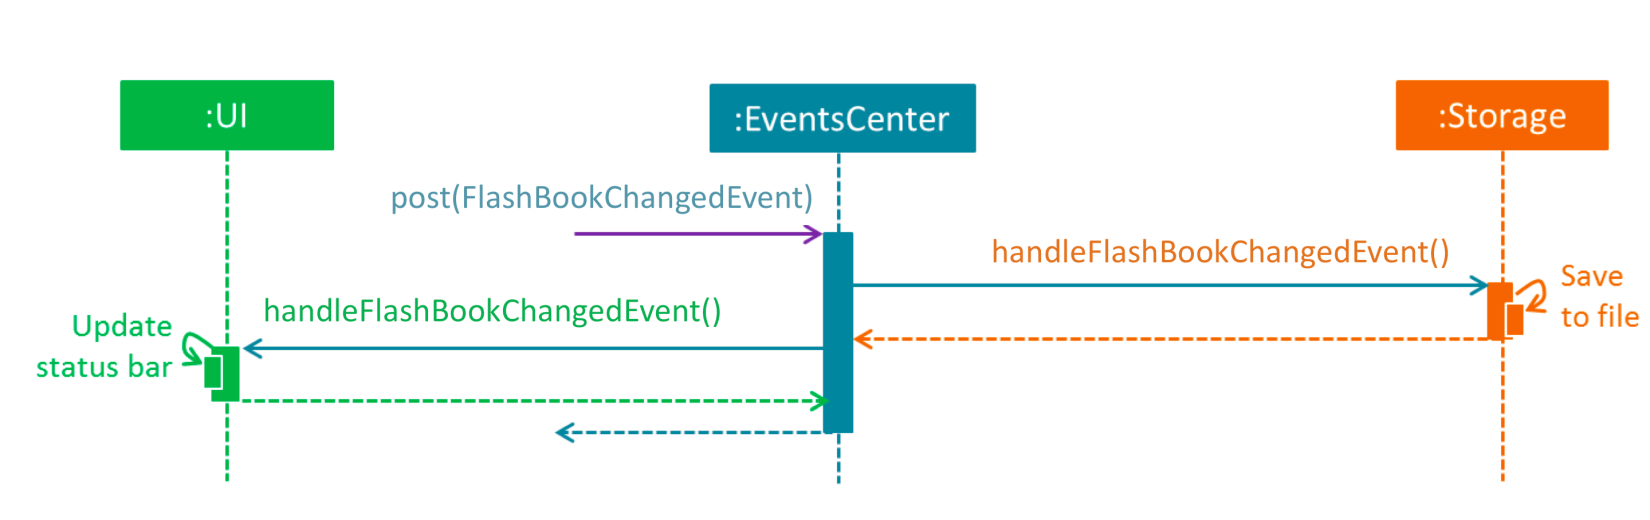
The diagram below shows how the EventsCenter reacts to that event, which eventually results in the updates being saved to the hard disk and the status bar of the UI being updated to reflect the 'Last Updated' time.
delete 1 command (part 2)2.2. UI component
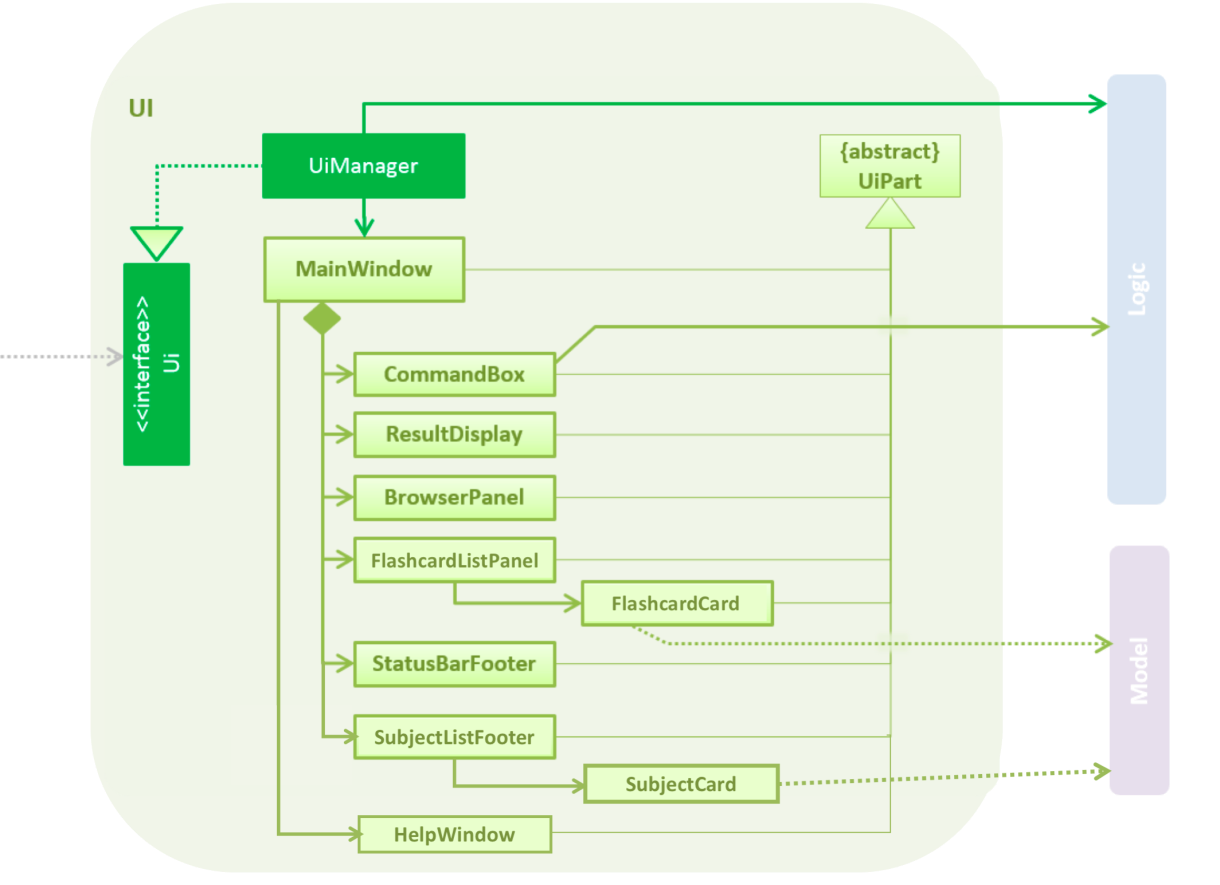
API : Ui.java
The UI consists of a MainWindow that is made up of parts e.g.CommandBox, ResultDisplay, FlashcardListPanel, StatusBarFooter, BrowserPanel etc. All these, including the MainWindow, inherit from the abstract UiPart class.
The UI component uses JavaFx UI framework. The layout of these UI parts are defined in matching .fxml files that are in the src/main/resources/view folder. For example, the layout of the MainWindow is specified in MainWindow.fxml
The UI component,
-
Executes user commands using the
Logiccomponent. -
Listens for changes to
Modeldata so that the UI can be updated with the modified data.
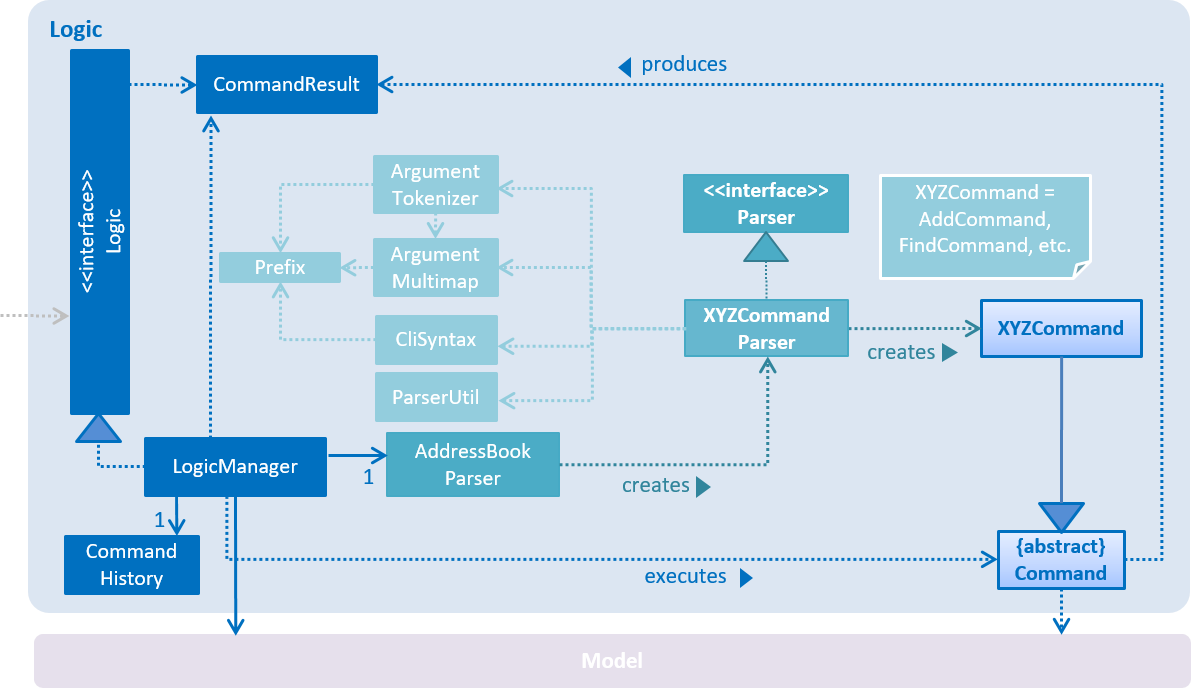
2.3. Logic component
API :
Logic.java
-
Logicuses theAddressBookParserclass to parse the user command. -
This results in a
Commandobject which is executed by theLogicManager. -
The command execution can affect the
Model(e.g. adding a flashcard). -
The result of the command execution is encapsulated as a
CommandResultobject which is passed back to theUi. -
In addition, the
CommandResultobject can also instruct theUito perform certain actions, such as displaying help to the user.
Given below is the Sequence Diagram for interactions within the Logic component for the execute("delete 1") API call.
delete 1 Command2.4. Model component
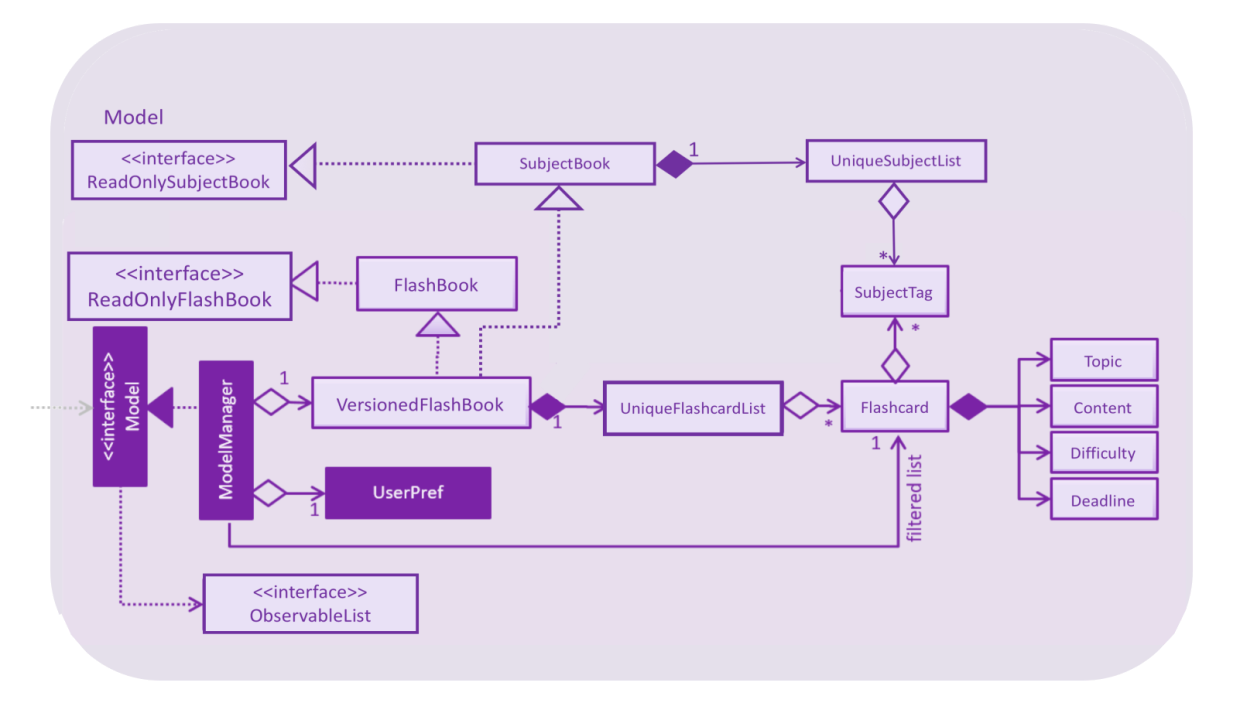
API : Model.java
The Model,
-
stores a
UserPrefobject that represents the user’s preferences. -
stores the Flash Book data.
-
exposes an unmodifiable
ObservableList<Flashcard>that can be 'observed' e.g. the UI can be bound to this list so that the UI automatically updates when the data in the list change. -
does not depend on any of the other three components.
2.5. Storage component

API : Storage.java
The Storage component,
-
can save
UserPrefobjects in json format and read it back. -
can save the Flash Book data in json format and read it back.
2.6. Common classes
Classes used by multiple components are in the seedu.addressbook.commons package.
3. Implementation
This section describes some noteworthy details on how certain features are implemented.
3.1. Toggle feature
3.1.1. Current Implementation
The toggling feature is mainly facilitated by 2 classes, NextCommand and PreviousCommand. For either commands to work, SelectCommand is first executed to retrieve the choice of Index of the flashcard to begin toggling.
Following that, NextCommand or PreviousCommand can be called interchangeably to toggle the flashcard being displayed in the rightmost panel.
For NextCommand, the following operations are implemented:
-
NextCommand#getNextIndex(Index index)— retrieves the current flashcard’s Index fromSelectCommandclass. -
NextCommand#setNextIndex(Index index, int start)— pass the index currently being used inNextCommandtoPreviousCommand.
Similarly, for PreviousCommand, the following operations are implemented:
-
PreviousCommand#getPreviousIndex(Index index)— retrieves the current flashcard’s Index fromSelectCommandclass. -
PreviousCommand#setPreviousIndex(Index index, int start)— pass the index currently being used inPreviousCommandtoNextCommand.
The sequence diagram below illustrates the execution of SelectCommand and how the index will be passed to both NextCommand and PreviousCommand class.
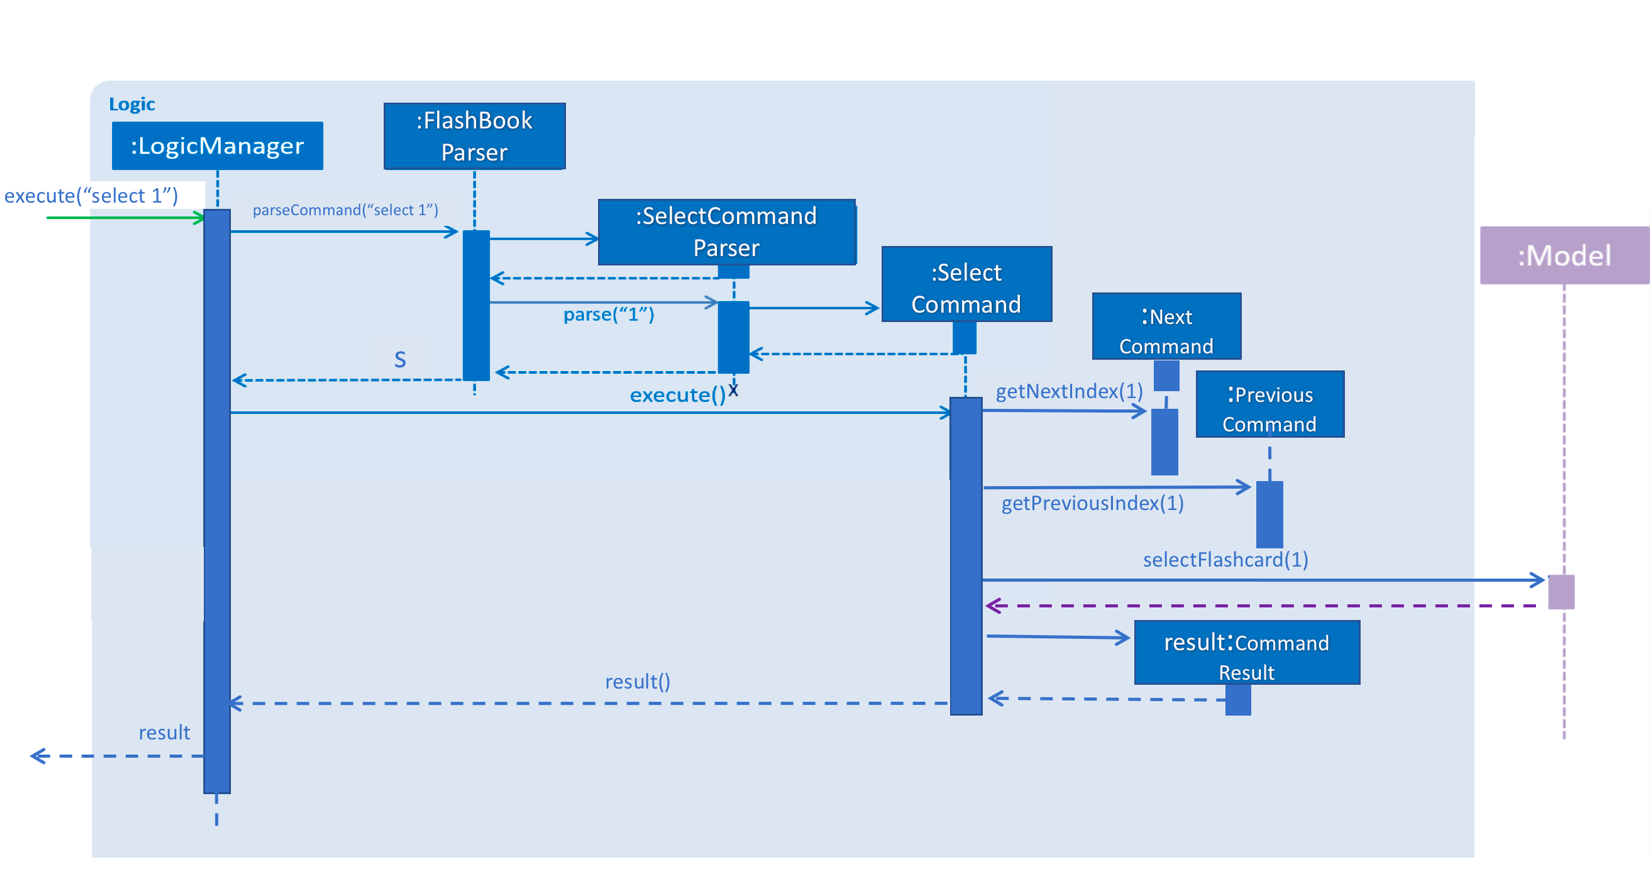
After SelectCommand is being called, NextCommand or PreviousCommand can be called interchangeably.
The sequence diagram belows illustrates the execution of NextCommand and how the index value will be passed to PreviousCommand class.
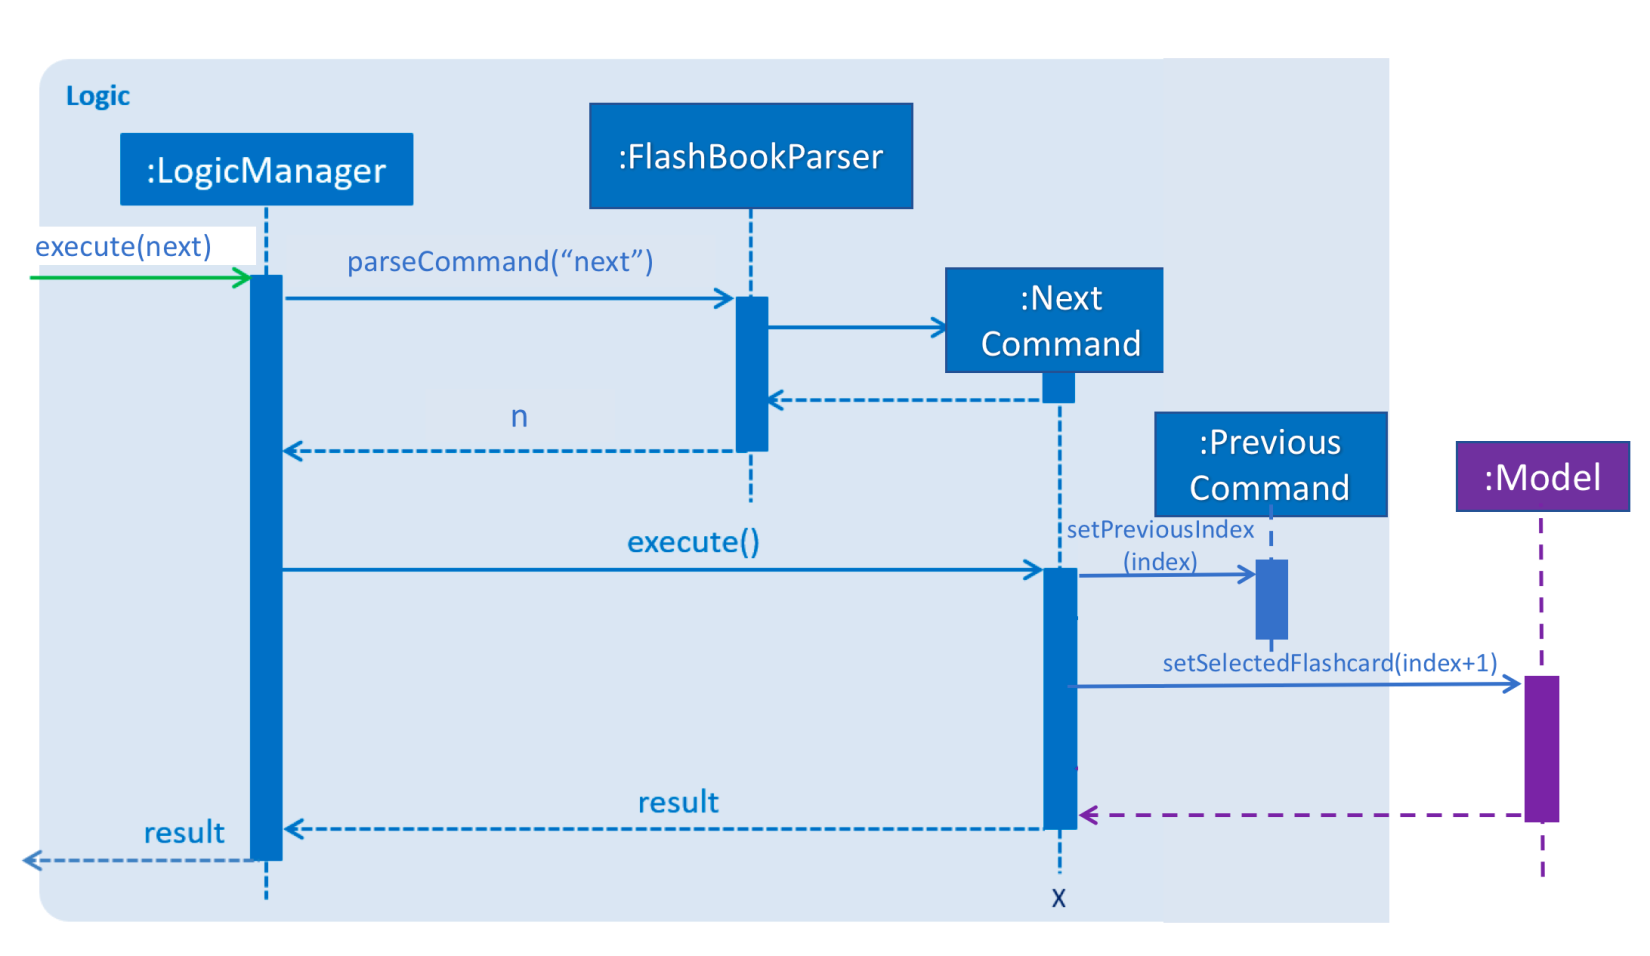
To execute toggling of next flashcard, execute the following commands:
1) select 2 [2 is just an example, choose index of choice]
2) next
Flashcard with next 3 will be displayed for the example above.
The sequence diagram below illustrates the execution of PreviousCommand and how the index value will be passed to NextCommand class.
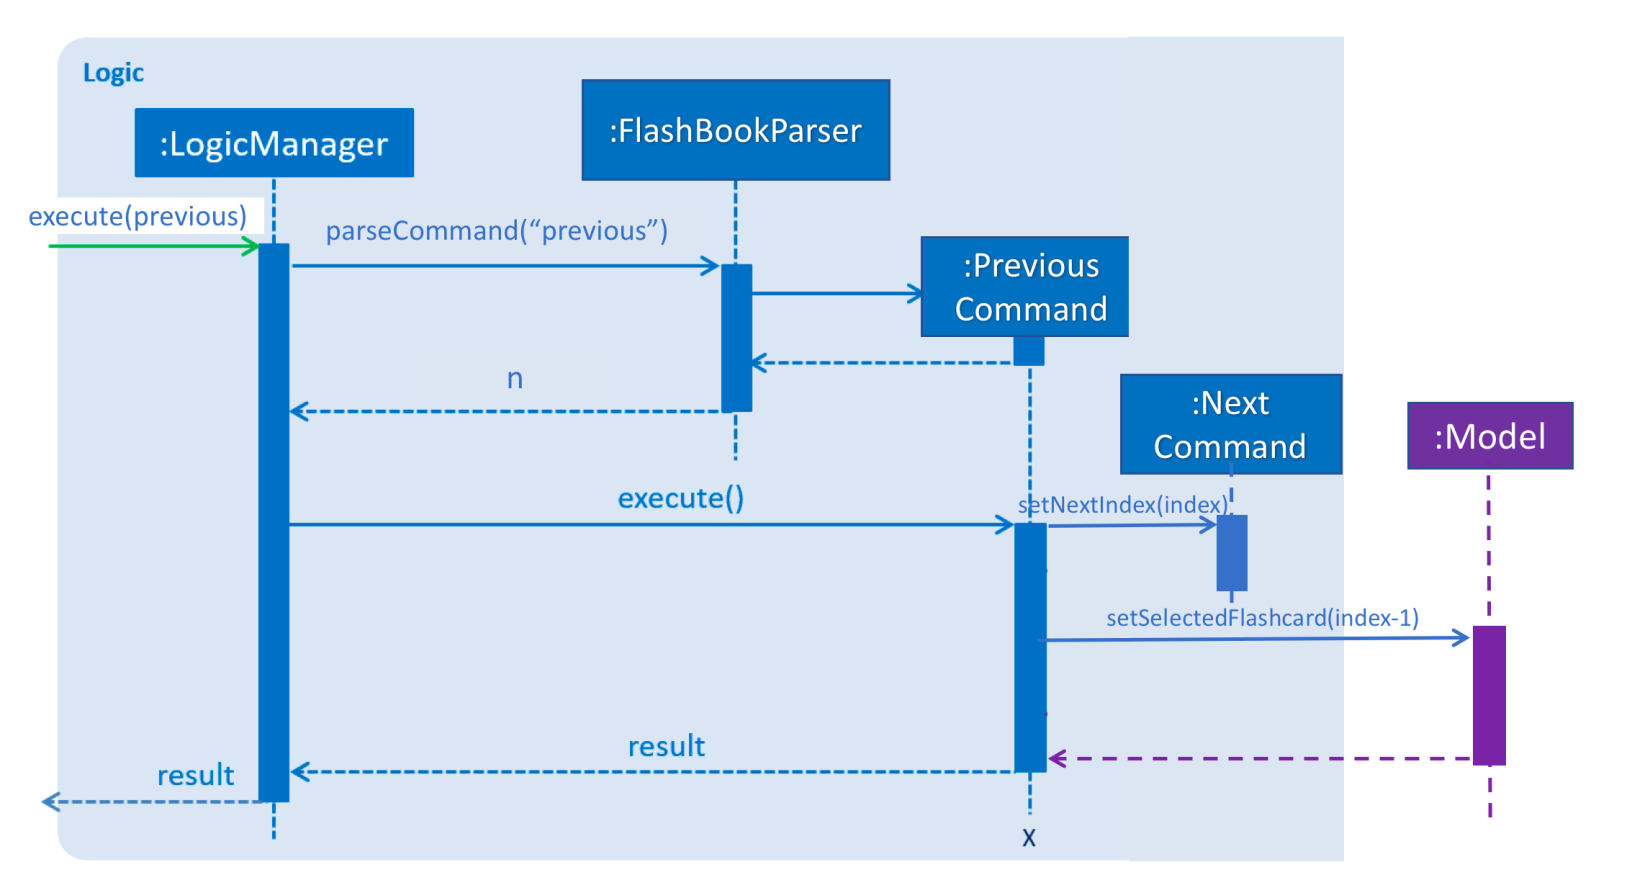
To execute toggling of previous flashcard, execute the following commands:
1) select 2 [2 is just an example, choose index of choice]
2) previous
Flashcard with next 1 will be displayed for the example above.
An example scenario of selecting the flashcard (Step 1) and executing the next or previous after select (Step 2) or otherwise (Step 3) is shown below.
Step 1: Selecting a Flashcard
-
Executing a
select INDEXcommand. -
The
INDEXwill be passed into Next Command, facilitated bygetNextIndex()in NextCommand class. In NextCommand class,nextIndexwill be initiated withINDEX+1to obtain the index number of the next flashcard. -
The
INDEXwill also be passed into Previous Command, facilitated bygetPreviousIndex()in PreviousCommand class. In PreviousCommand class, thepreviousIndexwill be initiated withINDEX-1to obtain the index number of the previous flashcard.
Step 2: Executing next or previous after select
The following is an execution of NextCommand:
-
As mentioned in step 1,
nextIndexhas been initiated with the index obtain through Select command. -
When NextCommand is called, the
nextIndexwill be passed into Previous Command, facilitated bysetPreviousIndex()in PreviousCommand class. In PreviousCommand class, thepreviousIndexwill now be replaced bynextIndex -1to obtain the index number of the previous flashcard. -
Lastly nextCommand will set the flashcard of
nextIndex, facilitated by setSelectedFlashcard() in model. -
Thereafter, next or previous can be called interchangeably without having to select a flashcard.
The following is an execution of PreviousCommand:
-
As mentioned in step 1,
previousIndexhas been initiated with the index obtain through Select command. -
When PreviousCommand is called, the
previousIndexwill be passed into Next Command, facilitated bysetNextIndex()in NextCommand class. In NextCommand class, thenextIndexwill now be replaced bypreviousIndex+1to obtain the index number of the next flashcard. -
Lastly PreviousCommand will set flashcard of
previousIndex, facilitated by setSelectedFlashcard() in model. -
Thereafter, next or previous can be called interchangeably without having to select a flashcard.
3.1.2. Design Considerations
-
Alternative 1 (current choice): Obtain the index after select command.
-
Pros: Easy to implement and convenient for the user.
-
Cons: Have to manually select the first card to choose from.
-
-
Alternative 2: Toggling will begin from the first index.
-
Pros: Saves the user the step of having to select the index of choice.
-
Cons: Might be too troublesome for some users who wants to being from a flashcard index that is large.
-
3.2. Quizzing by Subject
A subject that is selected will have all the flashcards pertaining to it shown. This mode will help users to focus on a particular subject’s notes when studying.
3.2.1. Current Implementation
The FlashCards UI is divided into three panels from left to right – Subjects, Flashcards, and Content.
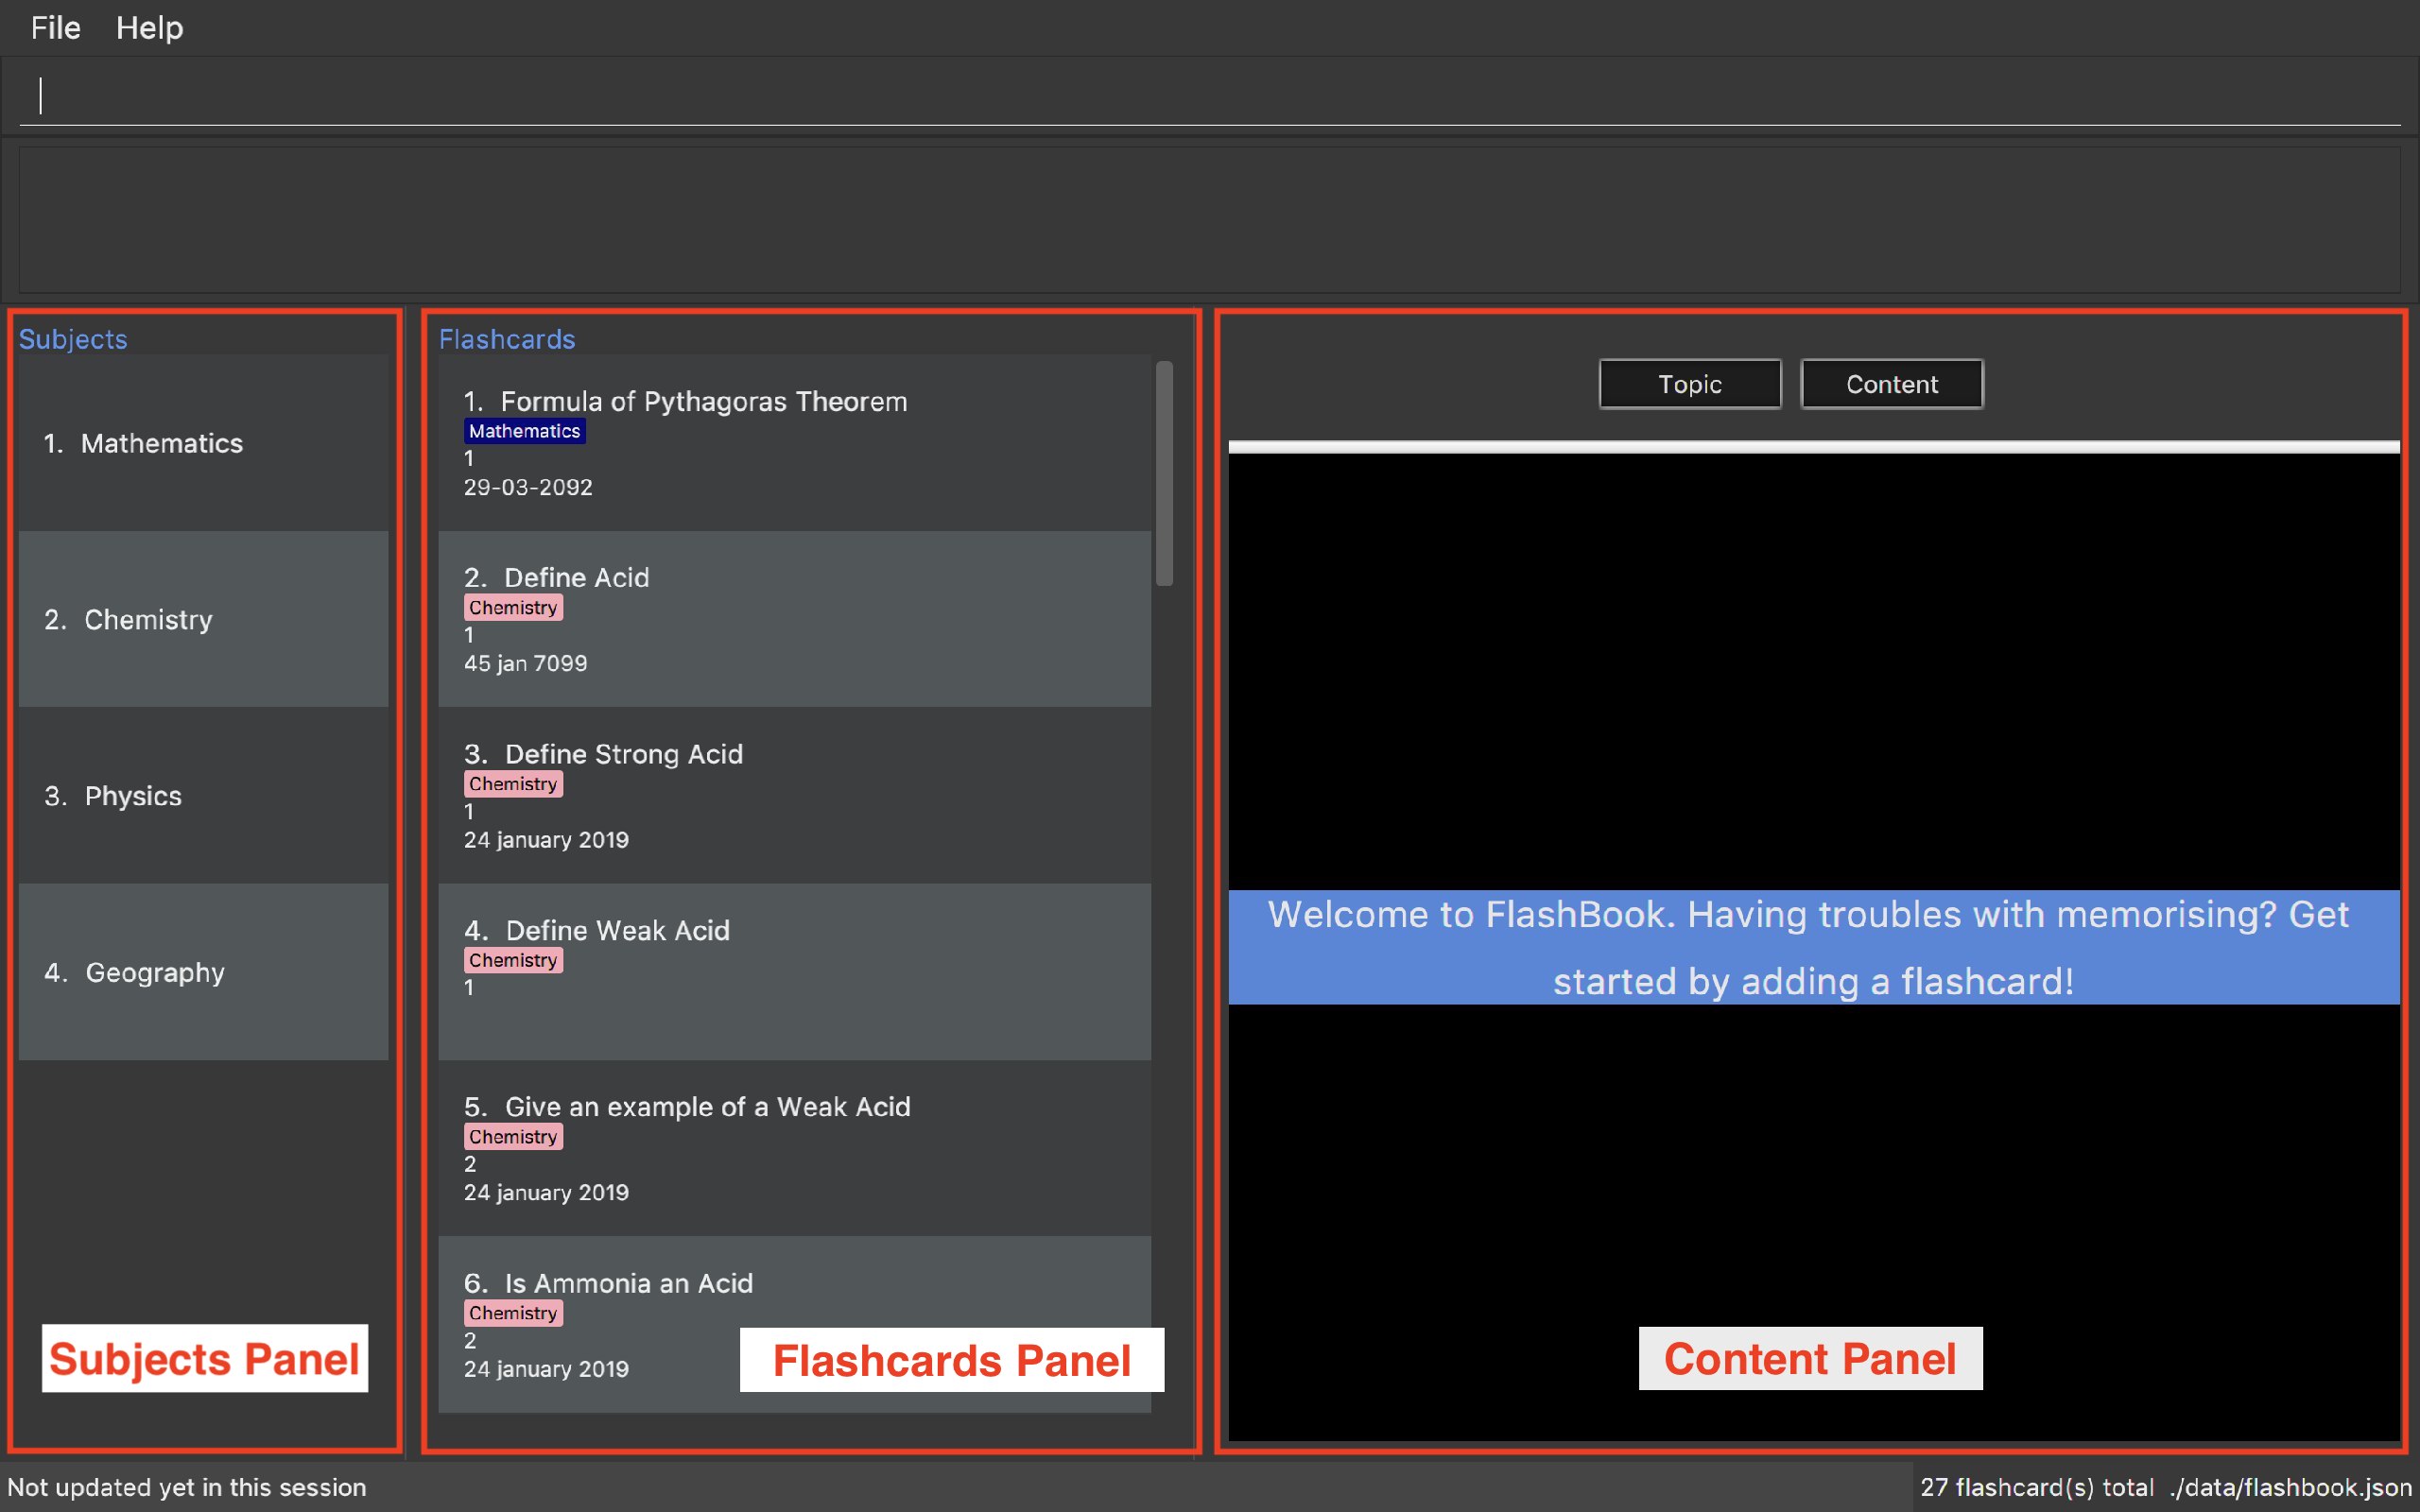
Figure. GUI of FlashCards
-
Subjects Panel (facilitated by
SubjectListPanelclass):
Displays:-
Subject tag
-
-
Flashcards Panel (facilitated by
FlashcardListPanelclass):
Displays information in this order:-
Topic of flashcard
-
Subject tag displayed as a coloured tag
-
Difficulty level of flashcard
-
(Optional) Deadline to memorize flashcard
-
-
Content Panel (facilitated by
RightPanelclass):
This panel is further sectioned into 2:-
Topic of flashcard
-
Content of flashcard
-
Upon adding a flashcard with the add command, (e.g. add t/Pythagoras Theorem diff/1 c/a^2 + b^2 = c^2 s/Math),
the subject tag "Math" will be added to a SubjectBook object and UniqueSubjectList object before being displayed in the subjects panel.
An example scenario of adding a flashcard (Step 1) and displaying the flashcards for each subject (Step 2) is shown below.
Step 1: Adding a flashcard
There are 2 possible cases when adding a flashcard:
-
Subject tag is unique among other flashcards
The Subject tag will be added to theUniqueSubjectListobject.
Shown below is the adding mechanism of a flashcard with a unique subject among other flashcards:
-
The Logic component’s
AddCommandclass is triggered every time the user adds a flashcard. It will then be facilitated byaddSubject()in the Model component. -
The Model component’s
addSubject()will useSubjectBook'saddSubject()to add the subject to a list that contains only unique subjects. -
The
SubjectBookclass will create anUniqueSubjectListobject to store all unique subjects. -
The
UniqueSubjectListobject will invoke itsaddSubject()function. This function will check if the currentUniqueSubjectListobject contains the subject tag of the current flashcard to be added. Since it is unique in this scenario, the subject tag of the current flashcard will be added to thisUniqueSubjectListobject. -
The
SubjectListPanelclass then displays this newly added subject in the subjects panel.-
Subject tag already exists in other flashcards
No Subject tag is added to theUniqueSubjectListobject.
-
Shown below is the adding mechanism of a flashcard whose subject already exists in other flashcards:
-
The Logic component’s
AddCommandclass is triggered every time the user adds a flashcard. It will then be facilitated byaddSubject()in the Model component. -
The Model component’s
addSubject()will useSubjectBook'saddSubject()to add the subject to a list that contains only unique subjects. -
SubjectBookwill create aUniqueSubjectListobject that stores all unique subjects. -
The
UniqueSubjectListobject will invoke itsaddSubject()function. This function will check if the currentUniqueSubjectListobject contains the subject tag of the current flashcard to be added. Since it is not unique in this scenario, the subject tag will not be added to thisUniqueSubjectListobject. -
The subjects panel remains unchanged.
The following sequence diagram summarises what happens in Step 1:
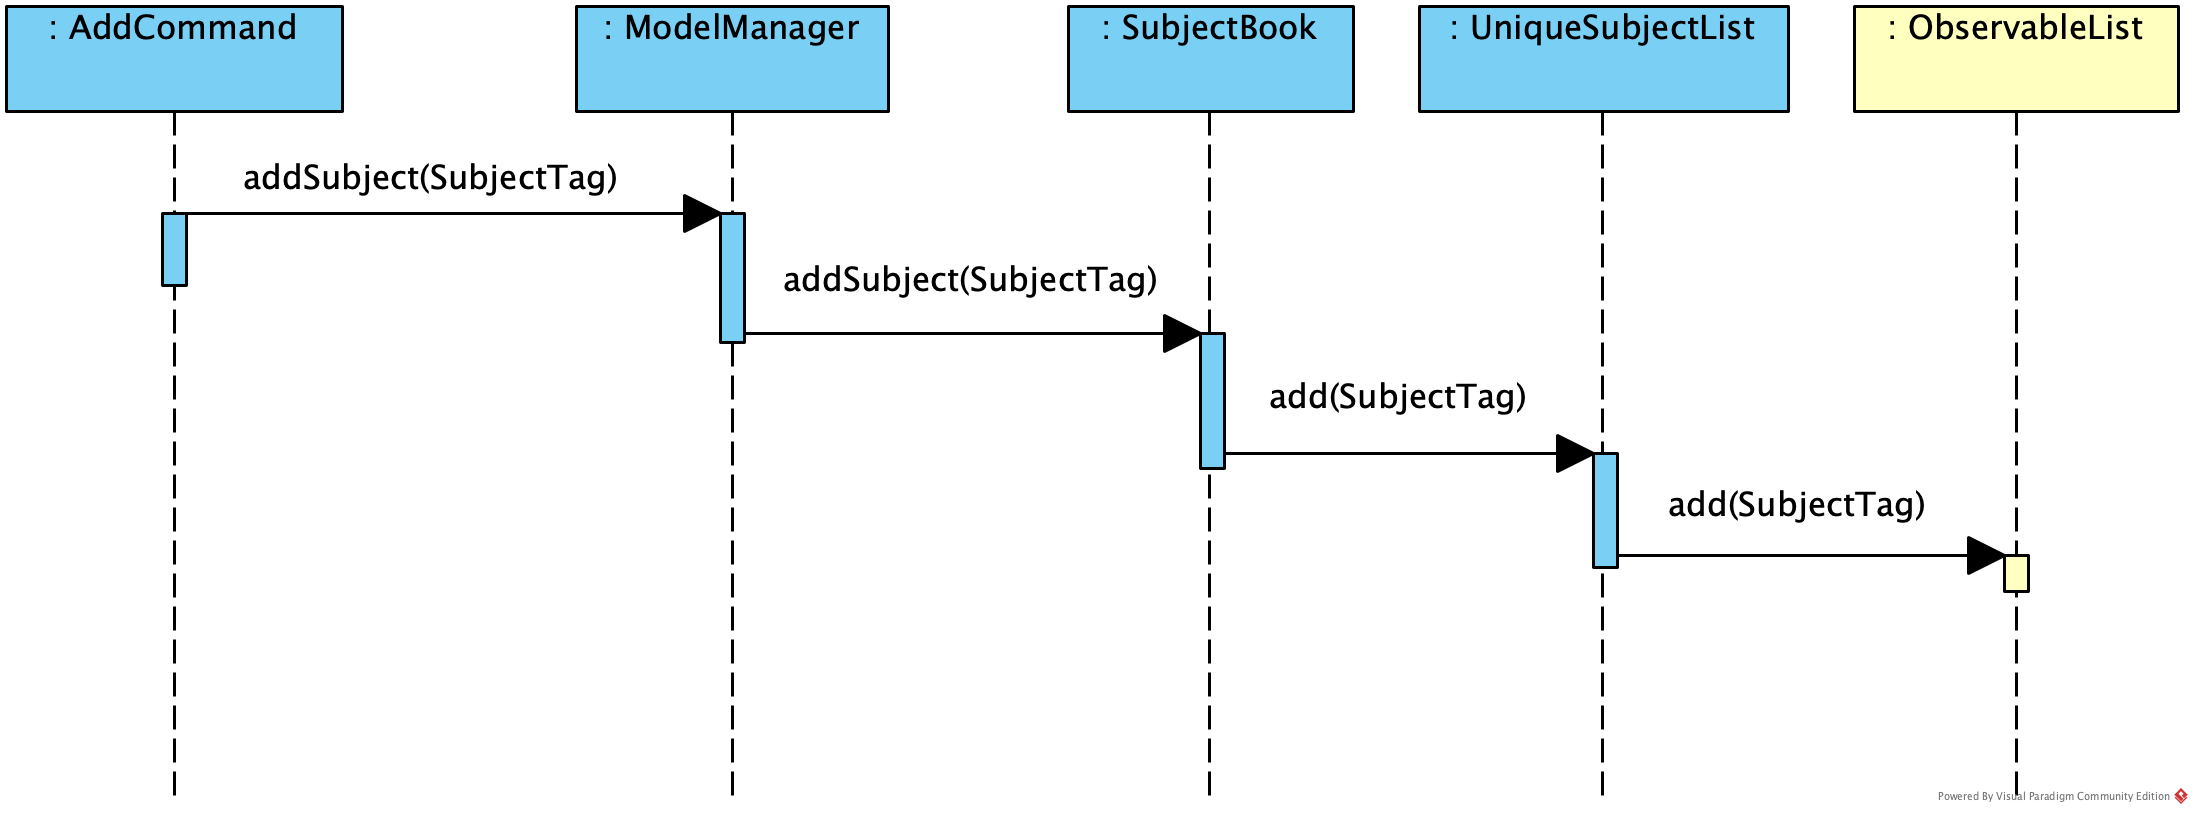
Figure: Sequence Diagram of adding a flashcard successfully
-
Blue — Logic and Model component
-
Yellow — JavaFX component
Step 2: Displaying flashcards according to subjects
After a flashcard is added, the following sequence of events will happen:
-
The UI component’s
MainWindowclass will create a newSubjectListPanelobject that takes in and invokes:-
Logic component’s
getFilteredSubjectList()— returnsfilteredSubjectswhich contains the list of unique subjects -
Logic component’s
selectedSubjectProperty()— returns theselectedSubjecttag clicked by the user -
Logic component’s
setSelectedSubject()— replaces previously selected subject with the newly selected subject
-
-
In the
SubjectListPanelclass-
setItems()andsetCellFactory()of JavaFX will populate the subjects panel with the unique subject list fromgetFilteredSubjectList().
-
-
The UI component’s
MainWindowclass will create a newFlashcardListPanelobject that takes in and invokes:-
Logic component’s
getFilteredFlashcardList()— returnsfilteredFlashcardswhich contains the list of unique flashcards -
Logic component’s
selectedSubjectProperty()— returns theselectedSubjecttag clicked by the user
-
-
In the
FlashcardListPanelclass-
setItems()andsetCellFactory()of JavaFX will populate the flashcards panel with the unique flashcard list fromgetFilteredFlashcardList(). -
A listener is attached to the
selectedSubjectPropertyvalue passed into this panel in order to detect when another subject is selected. -
When another subject is selected, the class invokes
updateFlashcardList(). It matches the subject tag of flashcards fromgetFilteredFlashcardList()with the newly selected subject. If the subject tag matches, this flashcard is added to anewFlashcardListobject. -
The flashcard panel is then populated with flashcards from the
newFlashcardListobject usingsetItems()andsetCellFactory()of JavaFX.
-
The following sequence diagram summarizes what happens in Step 2:
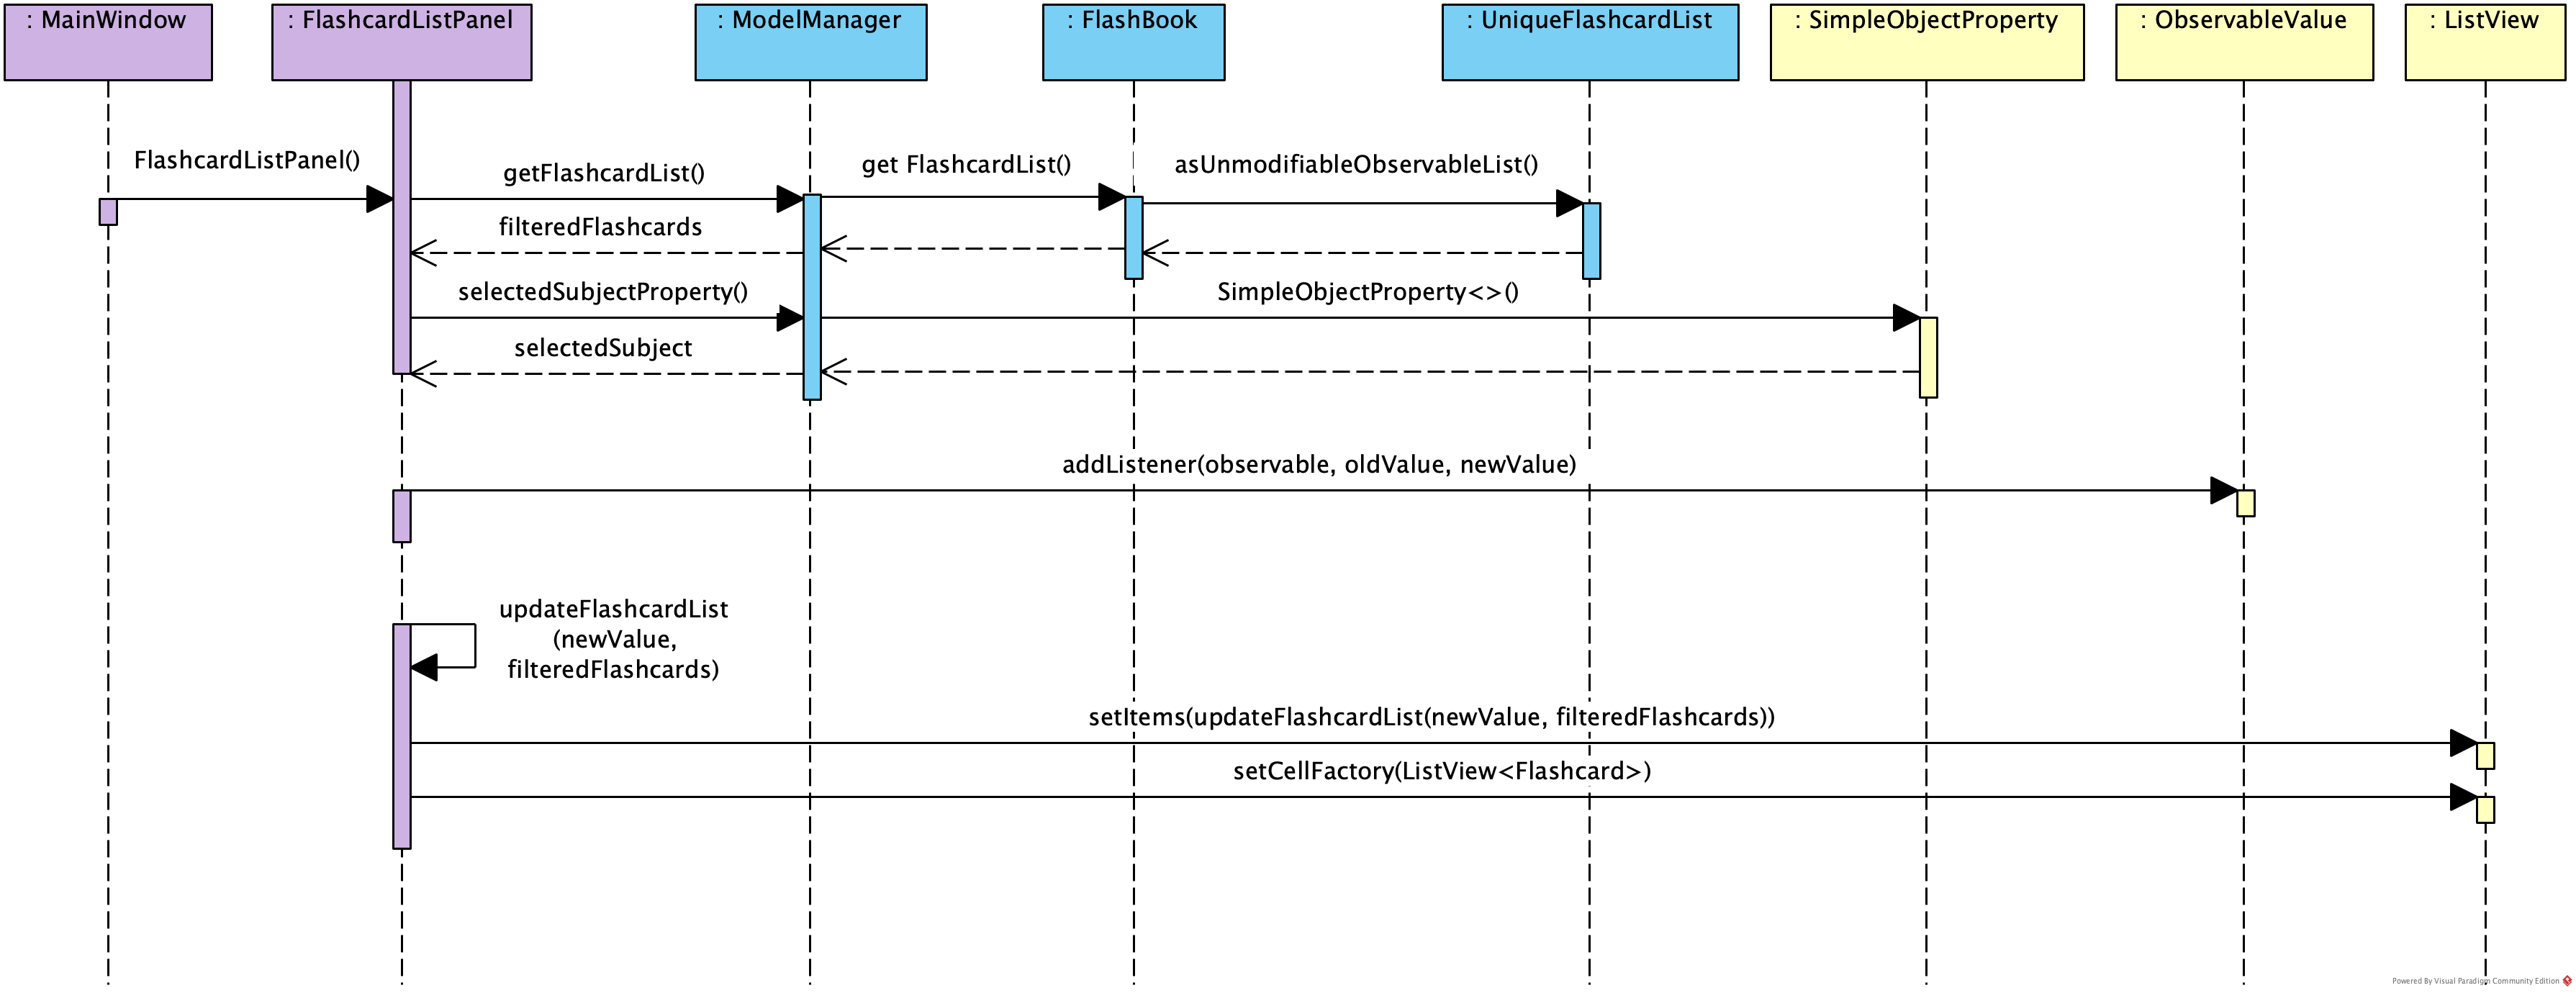
Figure: Sequence Diagram of displaying flashcards categorized by subject
-
Purple — UI component
-
Blue — Model component
-
Yellow — JavaFX component
3.2.2. Design Considerations
Aspect: When to add a unique subject to the UniqueSubjectList object
-
Alternative 1 (current choice): Check if subject is unique in
addSubject()ofUniqueSubjectListclass-
Pros: Supports code reusability.
-
Cons: More tedious to implement.
-
-
Alternative 2: Check if subject is unique in
AddCommandclass-
Pros: Easy to implement and a faster way of checking.
-
Cons: Does not support code reusability.
-
Aspect: Populating subject list on application startup
-
Alternative 1 (current choice): Populate subject list after flashcard list is populated
-
Pros: No need additional storage for the subject list.
-
Cons: Harder to implement.
-
-
Alternative 2: Populate subject list using what was stored in
SubjectBook-
Pros: Easy to implement as it populates subject list the same way as how flashcard list is populated.
-
Cons: Need to create additional storage for the subject list.
-
Aspect: Displaying subject name as a text label or a coloured subject tag
-
Alternative 1 (current choice): Text label
-
Pros: Easier to implement and UI is not overly colourful which makes it easier for the user’s eyes to adapt.
-
Cons: Inconsistency when displaying subject (i.e. plain text in subjects panel but coloured tag in flashcards panel).
-
-
Alternative 2: Coloured subject tag
-
Pros: More consistency when displaying subject in subjects panel and flashcards panel.
-
Cons: Harder to implement. Might also be harsher on the user’s eyes and he/she might not know where to focus on.
-
3.3. Quizzing by Difficulty
This mode will be largely focused on viewing flashcard based on a chosen difficulty. Flashcards are added with a difficulty level set by the user. The difficulty level can be toggled in this mode for the user to focus more on difficult concepts or easier concepts. This mode can be used along side "Subject" Testing Mode to get a further filtered list of flashcards with both chosen subject and difficulty.
3.3.1. Current Implementation
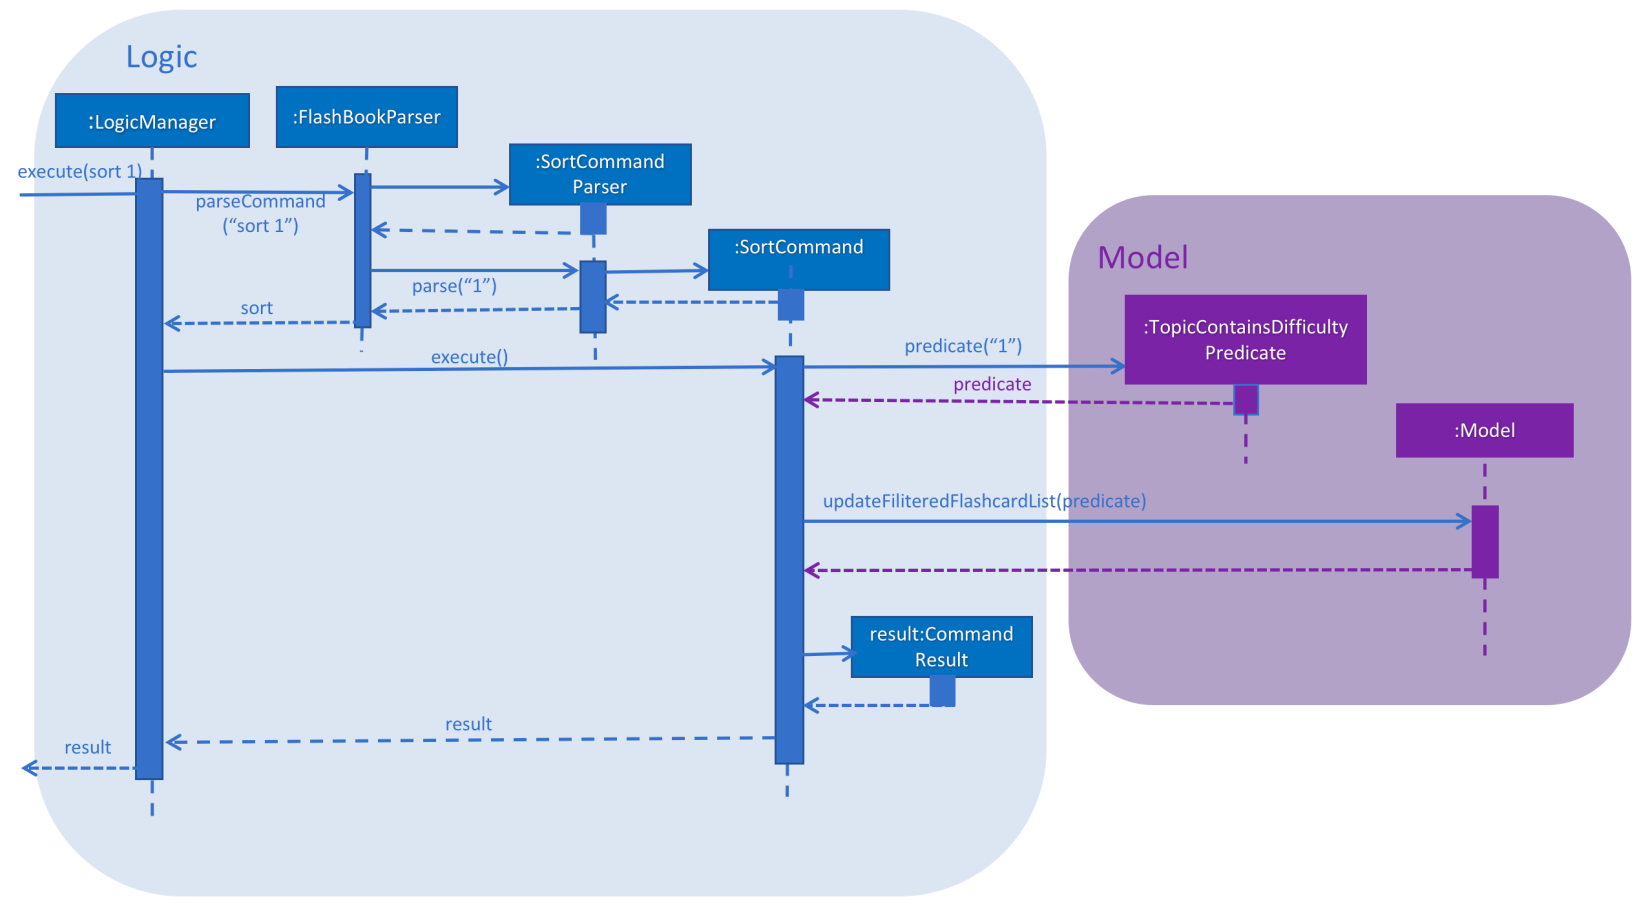
This mode of quizzing is facilitated by SortCommand. This command filters all the flashcard with the same difficulty level.
When a flashcard is added, user must input a difficulty level 1 (easy), 2 (medium) or 3 (difficult) for each flashcard.
The SortCommand will help students to focus on one chosen difficulty level, helping them prioritize their time well.
The sequence diagram below illustrate how SortCommand is executed.
3.3.2. Design Considerations
-
Alternative 1 (current choice): Filters flashcard and displays all flashcard with chosen difficulty.
-
Pros: Easy to implement.
-
Cons: Only get to see flashcards under 1 difficulty level.
-
-
Alternative 2: Displays flashcards in ascending or descending difficulty level.
-
Pros: Can view more flashcards at once.
-
Cons: Difficult to implement.
-
3.4. Shelf-Life of FlashCards
3.4.1. Current Implementation
The user can determine set a deadline for the flashcards and determine how long the flash cards will exist in the database “FlashCards”. The following operations are available:
-
FlashCards#deadline()orFlashCards#note()— Adds a deadline/note for the specified flashcard. -
FlashCards#deleteSubject()— Deletes a specific subject when in "Subject" Knowledge Testing Mode. -
FlashCards#clear()— Clears the entire database.
These operations are exposed in the Logic interface as Logic#deadline(), Logic#note(), Logic#deleteSubject() and Logic#clear() respectively.
3.4.2. Deadline Command
For the deadline command, the user can input a date whereby the flashcards would be unavailable thereafter.
Step 1. The user can input a deadline for the flashcard. An example of the command is deadline 3 d/12 January 2020.
Step 2. Upon adding to a specified flashcard, the deadline 12 January 2020 will be added to the index 3 flashcard.
Step 3. The deadline command also calls Model#commitFlashBook(), causing another modified flash book state to be saved into the flashBookStateList.
Step 4. In the case that a new date is to be added to a flashcard with an existing deadline or note, corrections can be made by overwriting the existing information with the same commands.
3.4.3. Deleting Flashcards
The user now decides that the deadline is over/the note is redundant and do not wish to save the flashcard in the database.
For the user to delete the existing flashcards in the database, there are two options available:
* Option 1: Deleting flashcards by subject. (deleteSubject command)
* Option 2: Deleting all flashcards. (clear command)
3.4.4. Option 1: Deleting flashcards by subject. (deleteSubject command)
By executing the deleteSubject command, the user can delete all the flashcards under the specified subject. In this case, we will be deleting the subject physics.
Step 1. When the deleteSubject command is called, it will be executed by the LogicManager.
Step 2. Next, it will be parsed through the FlashBookParser with commandWord deleteSubject() under parseCommand.
Step 3. The deleteSubject() in Model will then be executed and the specified subject physics will be deleted from the VersionedFlashBook.
Step 4. The deleteSubject command calls Model#commitFlashBook(), causing another modified flash book state to be saved into the flashBookStateList.
Step 5. The SubjectListPanel and FlashCardListPanel will also be updated with new indexes after the deletion.
This action is not reversible. The undo and redo command do not apply to the deletion of subjects.
|
The sequence diagram below illustrate how deleteSubjectCommand is executed.
image::deleteSubjectSequenceDiagram.png[width="800"]
3.4.5. Option 2: Deleting all flashcards. (clear command)
By executing the clear command, all the flashcards will be cleared from the database.
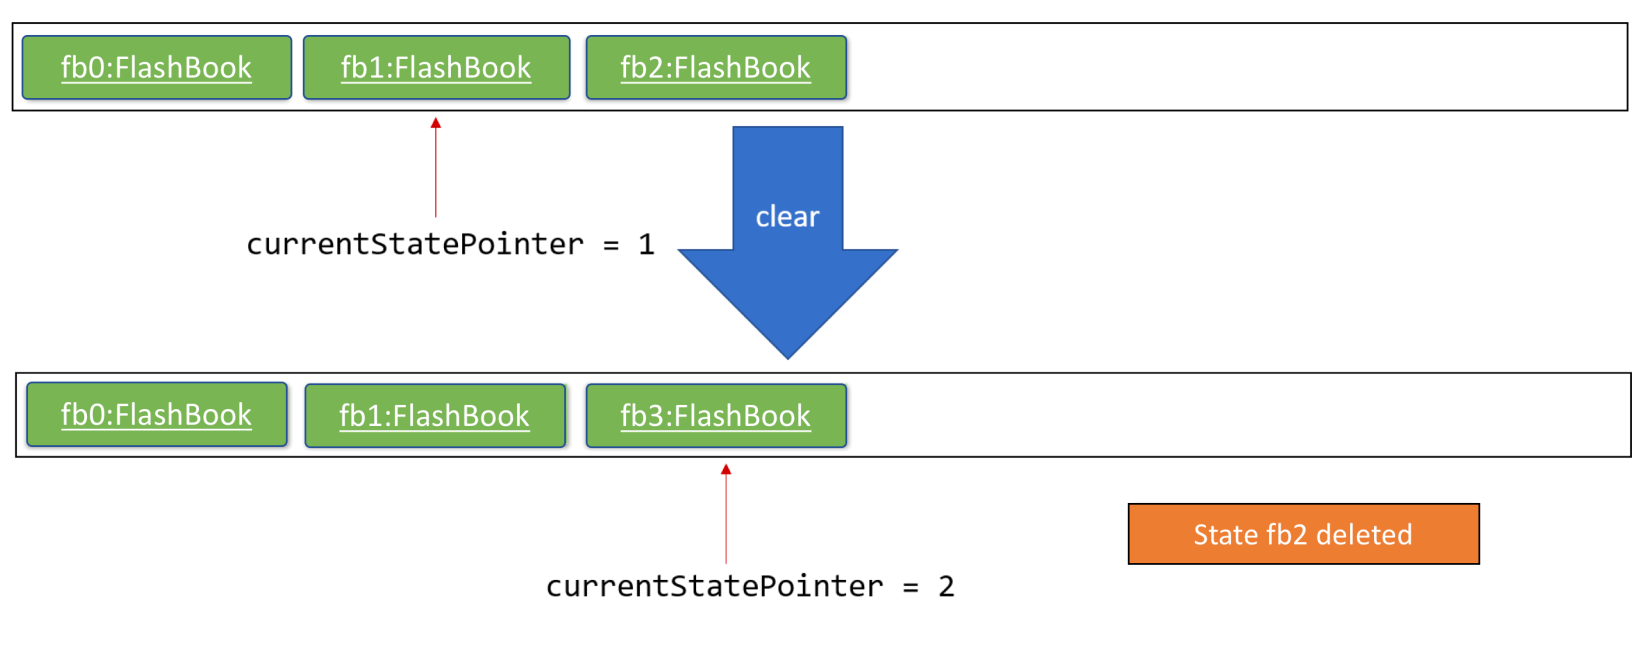
Step 1. When the clear command is called, it will call Logic#clear(), which will shift the currentStatePointer once to the left, pointing it to the previous flash card state, and clear all the respective flash cards in FlashCards.
Step 2. This command also calls Model#commitAddressBook().
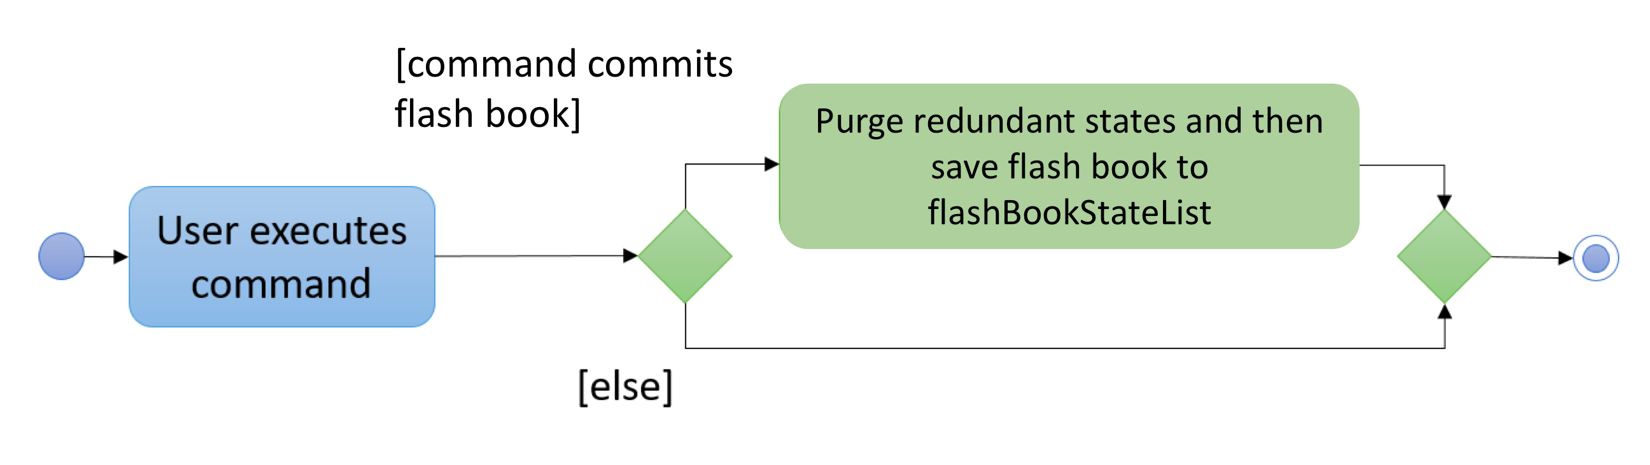
Step 3. Since the currentStatePointer is not pointing at the end of the flashBookStateList, all flash book states after the currentStatePointer will be purged. We designed it this way because it no longer makes sense to redo the clear command. This is the behavior that most modern desktop applications follow.
Step 4. Hence, all flashcards and subjects will be deleted in the database.
Step 5. The FlashBook will then be in a clean slate, at fb3.
The following activity diagram summarizes what happens when a user executes a 'clear' command:
This action is not reversible. The undo and redo command do not apply to the clearing of flashcards and subjects simultaneously.
|
3.4.6. Design Considerations
Aspect: How deadline/note executes
-
Alternative 1 (current choice): Manual deletion of the flashcards.
-
Pros: Allow the user to have the choice of keeping the flashcards or removing it.
-
Cons: Might be troublesome for some users.
-
-
Alternative 2: Auto deletion of the flashcards.
-
Pros: Easy to implement and convenient for the user. Deletes the flashcards right after the deadline.
-
Cons: Need to have additional internal calendar for the auto deletion. E.g. Java Calendar
-
Alternative 1 is chosen to provide users with the choice of keeping and deleting flashcards as and when they want. Even though it will result in overloading of overdue flashcards
and take up excess storage if the user does not manually delete, we designed the command in such a way that it accepts both dates and text. This provides two options for the users:
He/She can choose to write a date or write a note under the flashcard, for example, Clarify with the Teacher or Edit photosynthesis. This will allow the user to have the freedom to write whatever they require rather than just deadlines.
Aspect: Data structure to support the deadline/note commands
-
Alternative 1 (current choice): Use the
deleteSubjectorclearcommand to manually delete flashcards.-
Pros: Give the user the choice to keep or delete the flashcards. Also, the user can choose to delete the flashcards by subjects or delete all the flashcards altogether.
-
Cons: Both
deleteSubjectandclearcommands cannot be undone once implemented.
-
-
Alternative 2: Implement an internal calendar to calculate the number of days left and auto-deletion of flashcards after the deadline.
-
Pros: Auto deletion of flash cards.
-
Cons: Need to pay extra caution for Leap years. Users do not have the choice of keeping flashcards after the deadline.
-
Alternative 1 is chosen to provide users with the choice of deleting flashcards as and when they want. Even though it will take up extra storage if the user does not manually delete, the user will have better control over what they want to store and delete in the application.
3.5. Logging
We are using java.util.logging package for logging. The LogsCenter class is used to manage the logging levels and logging destinations.
-
The logging level can be controlled using the
logLevelsetting in the configuration file (See Section 3.6, “Configuration”) -
The
Loggerfor a class can be obtained usingLogsCenter.getLogger(Class)which will log messages according to the specified logging level -
Currently log messages are output through:
Consoleand to a.logfile.
Logging Levels
-
SEVERE: Critical problem detected which may possibly cause the termination of the application -
WARNING: Can continue, but with caution -
INFO: Information showing the noteworthy actions by the App -
FINE: Details that is not usually noteworthy but may be useful in debugging e.g. print the actual list instead of just its size
3.6. Configuration
Certain properties of the application can be controlled (e.g user prefs file location, logging level) through the configuration file (default: config.json).
4. Documentation
We use asciidoc for writing documentation.
| We chose asciidoc over Markdown because asciidoc, although a bit more complex than Markdown, provides more flexibility in formatting. |
4.1. Editing Documentation
See UsingGradle.adoc to learn how to render .adoc files locally to preview the end result of your edits.
Alternatively, you can download the AsciiDoc plugin for IntelliJ, which allows you to preview the changes you have made to your .adoc files in real-time.
4.2. Publishing Documentation
See UsingTravis.adoc to learn how to deploy GitHub Pages using Travis.
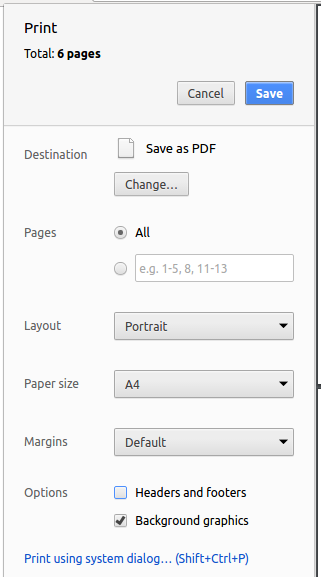
4.3. Converting Documentation to PDF format
We use Google Chrome for converting documentation to PDF format, as Chrome’s PDF engine preserves hyperlinks used in webpages.
Here are the steps to convert the project documentation files to PDF format.
-
Follow the instructions in UsingGradle.adoc to convert the AsciiDoc files in the
docs/directory to HTML format. -
Go to your generated HTML files in the
build/docsfolder, right click on them and selectOpen with→Google Chrome. -
Within Chrome, click on the
Printoption in Chrome’s menu. -
Set the destination to
Save as PDF, then clickSaveto save a copy of the file in PDF format. For best results, use the settings indicated in the screenshot below.
4.4. Site-wide Documentation Settings
The build.gradle file specifies some project-specific asciidoc attributes which affects how all documentation files within this project are rendered.
Attributes left unset in the build.gradle file will use their default value, if any.
|
| Attribute name | Description | Default value |
|---|---|---|
|
The name of the website. If set, the name will be displayed near the top of the page. |
not set |
|
URL to the site’s repository on GitHub. Setting this will add a "View on GitHub" link in the navigation bar. |
not set |
|
Define this attribute if the project is an official SE-EDU project. This will render the SE-EDU navigation bar at the top of the page, and add some SE-EDU-specific navigation items. |
not set |
4.5. Per-file Documentation Settings
Each .adoc file may also specify some file-specific asciidoc attributes which affects how the file is rendered.
Asciidoctor’s built-in attributes may be specified and used as well.
Attributes left unset in .adoc files will use their default value, if any.
|
| Attribute name | Description | Default value |
|---|---|---|
|
Site section that the document belongs to.
This will cause the associated item in the navigation bar to be highlighted.
One of: * Official SE-EDU projects only |
not set |
|
Set this attribute to remove the site navigation bar. |
not set |
4.6. Site Template
The files in docs/stylesheets are the CSS stylesheets of the site.
You can modify them to change some properties of the site’s design.
The files in docs/templates controls the rendering of .adoc files into HTML5.
These template files are written in a mixture of Ruby and Slim.
|
Modifying the template files in |
5. Testing
5.1. Running Tests
There are three ways to run tests.
| The most reliable way to run tests is the 3rd one. The first two methods might fail some GUI tests due to platform/resolution-specific idiosyncrasies. |
Method 1: Using IntelliJ JUnit test runner
-
To run all tests, right-click on the
src/test/javafolder and chooseRun 'All Tests' -
To run a subset of tests, you can right-click on a test package, test class, or a test and choose
Run 'ABC'
Method 2: Using Gradle
-
Open a console and run the command
gradlew clean allTests(Mac/Linux:./gradlew clean allTests)
| See UsingGradle.adoc for more info on how to run tests using Gradle. |
Method 3: Using Gradle (headless)
Thanks to the TestFX library we use, our GUI tests can be run in the headless mode. In the headless mode, GUI tests do not show up on the screen. That means the developer can do other things on the Computer while the tests are running.
To run tests in headless mode, open a console and run the command gradlew clean headless allTests (Mac/Linux: ./gradlew clean headless allTests)
5.2. Types of tests
We have two types of tests:
-
GUI Tests - These are tests involving the GUI. They include,
-
System Tests that test the entire App by simulating user actions on the GUI. These are in the
systemtestspackage. -
Unit tests that test the individual components. These are in
seedu.address.uipackage.
-
-
Non-GUI Tests - These are tests not involving the GUI. They include,
-
Unit tests targeting the lowest level methods/classes.
e.g.seedu.address.commons.StringUtilTest -
Integration tests that are checking the integration of multiple code units (those code units are assumed to be working).
e.g.seedu.address.storage.StorageManagerTest -
Hybrids of unit and integration tests. These test are checking multiple code units as well as how the are connected together.
e.g.seedu.address.logic.LogicManagerTest
-
5.3. Troubleshooting Testing
Problem: HelpWindowTest fails with a NullPointerException.
-
Reason: One of its dependencies,
HelpWindow.htmlinsrc/main/resources/docsis missing. -
Solution: Execute Gradle task
processResources.
6. Dev Ops
6.1. Build Automation
See UsingGradle.adoc to learn how to use Gradle for build automation.
6.2. Continuous Integration
We use Travis CI and AppVeyor to perform Continuous Integration on our projects. See UsingTravis.adoc and UsingAppVeyor.adoc for more details.
6.3. Coverage Reporting
We use Coveralls to track the code coverage of our projects. See UsingCoveralls.adoc for more details.
6.4. Documentation Previews
When a pull request has changes to asciidoc files, you can use Netlify to see a preview of how the HTML version of those asciidoc files will look like when the pull request is merged. See UsingNetlify.adoc for more details.
6.5. Making a Release
Here are the steps to create a new release.
-
Update the version number in
MainApp.java. -
Generate a JAR file using Gradle.
-
Tag the repo with the version number. e.g.
v0.1 -
Create a new release using GitHub and upload the JAR file you created.
6.6. Managing Dependencies
A project often depends on third-party libraries. For example, Flash Book depends on the Jackson library for JSON parsing. Managing these dependencies can be automated using Gradle. For example, Gradle can download the dependencies automatically, which is better than these alternatives:
-
Include those libraries in the repo (this bloats the repo size)
-
Require developers to download those libraries manually (this creates extra work for developers)
Appendix A: Suggested Programming Tasks to Get Started
Suggested path for new programmers:
-
First, add small local-impact (i.e. the impact of the change does not go beyond the component) enhancements to one component at a time. Some suggestions are given in Section A.1, “Improving each component”.
-
Next, add a feature that touches multiple components to learn how to implement an end-to-end feature across all components. Section A.2, “Creating a new command:
remark” explains how to go about adding such a feature.
A.1. Improving each component
Each individual exercise in this section is component-based (i.e. you would not need to modify the other components to get it to work).
Logic component
Scenario: You are in charge of logic. During dog-fooding, your team realize that it is troublesome for the user to type the whole command in order to execute a command. Your team devise some strategies to help cut down the amount of typing necessary, and one of the suggestions was to implement aliases for the command words. Your job is to implement such aliases.
Do take a look at Section 2.3, “Logic component” before attempting to modify the Logic component.
|
-
Add a shorthand equivalent alias for each of the individual commands. For example, besides typing
clear, the user can also typecto remove all flashcards in the list.
Model component
Scenario: You are in charge of model. One day, the logic-in-charge approaches you for help. He wants to implement a command such that the user is able to remove a particular tag from everyone in the flash book, but the model API does not support such a functionality at the moment. Your job is to implement an API method, so that your teammate can use your API to implement his command.
Do take a look at Section 2.4, “Model component” before attempting to modify the Model component.
|
-
Add a
removeTag(Tag)method. The specified tag will be removed from everyone in the flash book.
Ui component
Scenario: You are in charge of ui. During a beta testing session, your team is observing how the users use your flash book application. You realize that one of the users occasionally tries to delete non-existent tags from a contact, because the tags all look the same visually, and the user got confused. Another user made a typing mistake in his command, but did not realize he had done so because the error message wasn’t prominent enough. A third user keeps scrolling down the list, because he keeps forgetting the index of the last flashcard in the list. Your job is to implement improvements to the UI to solve all these problems.
Do take a look at Section 2.2, “UI component” before attempting to modify the UI component.
|
-
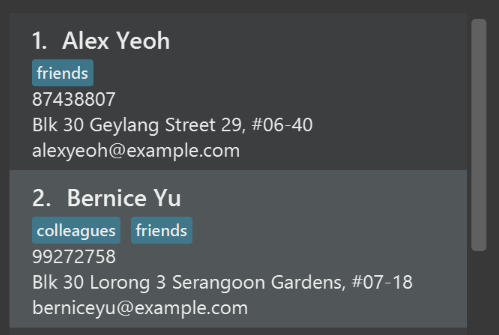
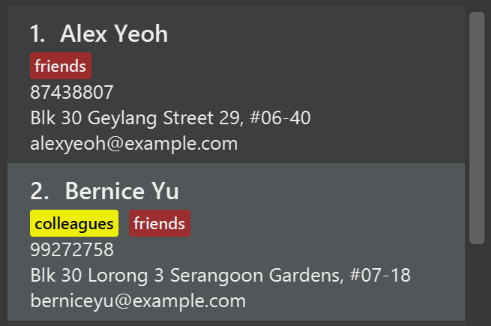
Use different colors for different tags inside flashcard cards. For example,
friendstags can be all in brown, andcolleaguestags can be all in yellow.Before
After
-
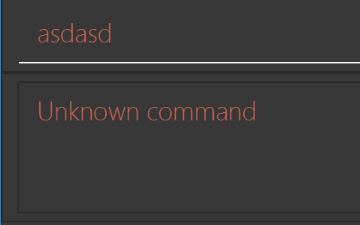
Modify
NewResultAvailableEventsuch thatResultDisplaycan show a different style on error (currently it shows the same regardless of errors).Before

After
-
Modify the
StatusBarFooterto show the total number of people in the flash book.Before

After

Storage component
Scenario: You are in charge of storage. For your next project milestone, your team plans to implement a new feature of saving the flash book to the cloud. However, the current implementation of the application constantly saves the flash book after the execution of each command, which is not ideal if the user is working on limited internet connection. Your team decided that the application should instead save the changes to a temporary local backup file first, and only upload to the cloud after the user closes the application. Your job is to implement a backup API for the flash book storage.
Do take a look at Section 2.5, “Storage component” before attempting to modify the Storage component.
|
-
Add a new method
backupAddressBook(ReadOnlyAddressBook), so that the flash book can be saved in a fixed temporary location.
A.2. Creating a new command: remark
By creating this command, you will get a chance to learn how to implement a feature end-to-end, touching all major components of the app.
Scenario: You are a software maintainer for flashbook, as the former developer team has moved on to new projects. The current users of your application have a list of new feature requests that they hope the software will eventually have. The most popular request is to allow adding additional comments/notes about a particular contact, by providing a flexible remark field for each contact, rather than relying on tags alone. After designing the specification for the remark command, you are convinced that this feature is worth implementing. Your job is to implement the remark command.
A.2.1. Description
Edits the remark for a flashcard specified in the INDEX.
Format: remark INDEX r/[REMARK]
Examples:
-
remark 1 r/Likes to drink coffee.
Edits the remark for the first flashcard toLikes to drink coffee. -
remark 1 r/
Removes the remark for the first flashcard.
A.2.2. Step-by-step Instructions
[Step 1] Logic: Teach the app to accept 'remark' which does nothing
Let’s start by teaching the application how to parse a remark command. We will add the logic of remark later.
Main:
-
Add a
RemarkCommandthat extendsCommand. Upon execution, it should just throw anException. -
Modify
AddressBookParserto accept aRemarkCommand.
Tests:
-
Add
RemarkCommandTestthat tests thatexecute()throws an Exception. -
Add new test method to
AddressBookParserTest, which tests that typing "remark" returns an instance ofRemarkCommand.
[Step 2] Logic: Teach the app to accept 'remark' arguments
Let’s teach the application to parse arguments that our remark command will accept. E.g. 1 r/Likes to drink coffee.
Main:
-
Modify
RemarkCommandto take in anIndexandStringand print those two parameters as the error message. -
Add
RemarkCommandParserthat knows how to parse two arguments, one index and one with prefix 'r/'. -
Modify
AddressBookParserto use the newly implementedRemarkCommandParser.
Tests:
-
Modify
RemarkCommandTestto test theRemarkCommand#equals()method. -
Add
RemarkCommandParserTestthat tests different boundary values forRemarkCommandParser. -
Modify
AddressBookParserTestto test that the correct command is generated according to the user input.
[Step 3] Ui: Add a placeholder for remark in PersonCard
Let’s add a placeholder on all our PersonCard s to display a remark for each flashcard later.
Main:
-
Add a
Labelwith any random text insidePersonListCard.fxml. -
Add FXML annotation in
PersonCardto tie the variable to the actual label.
Tests:
-
Modify
PersonCardHandleso that future tests can read the contents of the remark label.
[Step 4] Model: Add Remark class
We have to properly encapsulate the remark in our Flashcard class. Instead of just using a String, let’s follow the conventional class structure that the codebase already uses by adding a Remark class.
Main:
-
Add
Remarkto model component (you can copy fromFlashcard, remove the regex and change the names accordingly). -
Modify
RemarkCommandto now take in aRemarkinstead of aString.
Tests:
-
Add test for
Remark, to test theRemark#equals()method.
[Step 5] Model: Modify Flashcard to support a Remark field
Now we have the Remark class, we need to actually use it inside Flashcard.
Main:
-
Add
getRemark()inFlashcard. -
You may assume that the user will not be able to use the
addandeditcommands to modify the remarks field (i.e. the flashcard will be created without a remark). -
Modify
SampleDataUtilto add remarks for the sample data (delete yourdata/addressbook.jsonso that the application will load the sample data when you launch it.)
[Step 6] Storage: Add Remark field to JsonAdaptedPerson class
We now have Remark s for Flashcard s, but they will be gone when we exit the application. Let’s modify JsonAdaptedPerson to include a Remark field so that it will be saved.
Main:
-
Add a new JSON field for
Remark.
Tests:
-
Fix
invalidAndValidPersonAddressBook.json,typicalPersonsAddressBook.json,validAddressBook.jsonetc., such that the JSON tests will not fail due to a missingremarkfield.
[Step 6b] Test: Add withRemark() for PersonBuilder
Since Flashcard can now have a Remark, we should add a helper method to PersonBuilder, so that users are able to create remarks when building a Flashcard.
Tests:
-
Add a new method
withRemark()forPersonBuilder. This method will create a newRemarkfor the flashcard that it is currently building. -
Try and use the method on any sample
FlashcardinTypicalPersons.
[Step 7] Ui: Connect Remark field to PersonCard
Our remark label in PersonCard is still a placeholder. Let’s bring it to life by binding it with the actual remark field.
Main:
-
Modify
PersonCard's constructor to bind theRemarkfield to the `Flashcard ` 's remark.
Tests:
-
Modify
GuiTestAssert#assertCardDisplaysPerson(…)so that it will compare the now-functioning remark label.
[Step 8] Logic: Implement RemarkCommand#execute() logic
We now have everything set up… but we still can’t modify the remarks. Let’s finish it up by adding in actual logic for our remark command.
Main:
-
Replace the logic in
RemarkCommand#execute()(that currently just throws anException), with the actual logic to modify the remarks of a flashcard.
Tests:
-
Update
RemarkCommandTestto test that theexecute()logic works.
A.2.3. Full Solution
See this PR for the step-by-step solution.
Appendix B: Product Scope
Target user profile:
-
(Mainly) Secondary School students
-
Has a need to memorise notes
-
Prefer digital notes over paper and pen
-
Reasonably comfortable with using CLI applications
Value proposition:
-
Digitize notes
-
One-stop platform to access all of one’s notes
-
Organize one’s notes based on subjects
-
Help with the memorisation of notes through the use of flashcards (e.g. before exams)
Appendix C: User Stories
Priorities: High (must have) - * * *, Medium (nice to have) - * *, Low (unlikely to have) - *
| Priority | As a … | I want to … | So that I can… |
|---|---|---|---|
|
New User |
See usage instructions |
Refer to instructions when I forget how to use the App |
|
User |
Add a new flashcard |
Insert a new unique flashcard |
|
User |
Edit a flashcard |
Change my mistakes |
|
User |
Delete a flashcard through its index |
Remove flashcards that I no longer need |
|
User |
List flashcards categorized by flashcards |
Have an overview of the flashcards I currently have |
|
User |
View flashcards categorized by subjects |
Have an overview of the flashcards I currently have for a particular subject |
|
User |
Use the GUI |
Perform certain operations easily with just a click |
|
User |
Identify my flashcards easily |
Have a better user experience with the application |
|
User |
Find a flashcard |
Locate the flashcard I need without going through the entire list |
|
User |
Add a deadline or note to a flashcard |
Aware of when the content is needed |
|
User |
Sort the flashcards according to Difficulty |
Categorise the flashcards according to the difficulty levels |
|
User |
Categorise the flashcards according to Subjects |
Split the flashcards into respective subjects |
|
User |
Have a overview of Subject, Flashcard, Topic and Content |
Sees the entire flashbook in a glance |
|
User |
View next flashcard |
Navigate through the flashcard list |
|
User |
View previous flashcard |
Navigate through the flashcard list |
|
User |
View number of flashcards |
Shows the number of flashcards |
|
User |
View topic and content of flashcard separately |
Shows only one at each time |
|
User |
Alias for commands |
Reduce the time to input each long command |
|
User |
Hide the content of my flashcard |
Quiz myself more effectively |
|
User |
Show the content of my flashcard |
Quiz myself more effectively |
|
User |
Add a countdown calendar for my flashcards |
Aware of how many days left to be familiar with the content |
|
User |
Categorize each flashcard by importance |
Prioritise which information to study or memorise first |
|
User |
Choose the color of the subject tag |
Personalize my FlashBook |
|
User |
Delete unnecessary flashcards automatically |
Prevent overloading of flashcards |
|
User |
Retrieve a recently deleted flashcard |
Retrieve the flashcard which I might have accidentally deleted |
|
New User |
Create a new account |
Only see flashcards and flashcards that are customised by me |
|
User |
Use an application that is not just monochromatic in colour |
Have a better user experience |
|
User |
Login |
Perform actions that only pertain to my account |
|
User |
Share notes with friends who also have an account |
Test myself with my friend’s flashcard when I have finished mine. |
|
User |
Encrypt my data |
Ensure my data is secure |
Appendix D: Use Cases
(For all use cases below, the System is the FlashCards and the Actor is the User, unless specified otherwise)
Use Case: Adding a Flashcard
MSS
-
User enters data to add as a flashcard
-
FlashCards displays the flashcard that was just added
Use case ends.
Use case: Editing a Flashcard
MSS 1. User enters the flashcard of the flashcard to be edited 2. FlashCards displays a list of flashcards belonging to the same flashcard 3. User selects the index of the flashcard to edit 4. FlashCards prompts for new data 5. User enters new data 6. FlashCards displays the updated flashcard
Use case ends.
Use case: Deleting a Flashcard
MSS
-
User enters the flashcard of the flashcard to be deleted
-
FlashCards displays a list of flashcards belonging to the same flashcard
-
User selects the index of the flashcard to delete
-
FlashCards displays the updated list of flashcards Use case ends.
Use Case: Deleting Flashcards Based on Subject
MSS
-
User selects a subject
-
FlashCards deletes the list of flashcards for that subject.
Use case ends.
Use Case: Finding a Flashcard
MSS
-
User selects a subject
-
FlashCards displays a list of flashcards belonging to the same subject
-
User enters a keyword
-
FlashCards displays all flashcards that contains the given keyword
Use case ends.
Use case: Selecting a Flashcard
MSS
-
User enters the subject of the flashcard to be displayed
-
FlashCards displays a list of flashcards belonging to the same subject
-
User selects the index of the flashcard to view
-
FlashCards displays the flashcard of the chosen index
Use case ends.
Use Case: Viewing the next Flashcard
MSS
-
User enters the subject of the flashcard to be displayed
-
FlashCards displays a list of flashcards belonging to the same subject
-
User selects the index of the flashcard to view
-
FlashCards displays the flashcard of the chosen index
-
User enters next to view the flashcard with the next index
-
FlashCards displays the next flashcard
Use case ends.
Use Case: Viewing the previous Flashcard
MSS
-
User enters the subject of the flashcard to be displayed
-
FlashCards displays a list of flashcards belonging to the same subject
-
User selects the index of the flashcard to view
-
FlashCards displays the flashcard of the chosen index
-
User enters previous to view the flashcard with the previous index
-
FlashCards displays the previous flashcard
Use case ends.
Use case: Listing all Flashcards categorized by Subjects
MSS
-
User enters the subject of the flashcards to be displayed
-
FlashCards displays an indexed list of flashcards categorized by flashcards
Use case ends.
D.1. Use Case: Sorting all Flashcards categorized by Difficulty
MSS
-
User enters the difficulty of the flashcards to be displayed
-
FlashCards displays an indexed list of flashcards categorized by selected difficulty
Use case ends.
D.2. Use Case: Create Account (coming in v2.0)
MSS
-
User enters a new username
-
FlashCards creates a new User Account
Use case ends.
Extensions
-
1a. Username is taken
-
1a1. FlashCards prints error message
Use case resumes at step 1.
-
Use Case: Login (coming in v2.0)
MSS 1. User enters username 2. FlashCards retrieves all relevant data for user account Use case ends.
Extensions
-
1a. Account not found
-
1a1. FlashCards prints error message
Use case resumes at step 1.
-
Appendix E: Non Functional Requirements
-
Should work on any mainstream OS as long as it has Java
9or higher installed. -
Should be able to hold up to 1000 flashcards without a noticeable sluggishness in performance for typical usage.
-
A user with above average typing speed for regular English text (i.e. not code, not system admin commands) should be able to accomplish most of the tasks faster using commands than using the mouse.
E.1. Performance Requirement
The product will have a high performance speed of less than 2 seconds.
E.2. Interface Requirement
The product will have a simple and user-friendly interface, making it easy even for new users using our application.
E.3. Portability Requirement
The product can be used on both laptops and smart phones, allowing users to use them on the go.
E.4. Operational Requirement
The system is capable of categorizing the flashcards based on their subjects and allows easy access to flashcards when searching for one.
E.5. Technical Requirement
The system should work on common operating systems such as Mac OS, Windows, Linux and Solaris platform.
E.6. Constraints
The system is built on Java 9 and it is advisable to use it with the recommended version of Java 9. When used on a newer/older version of Java, the user might not be able to enjoy the full benefits of the application.
{More to be added}
Appendix G: Product Survey
Product Name
Author: …
Pros:
-
…
-
…
Cons:
-
…
-
…
Appendix H: Instructions for Manual Testing
Given below are instructions to test the app manually.
| These instructions only provide a starting point for testers to work on; testers are expected to do more exploratory testing. |
H.1. Launch and Shutdown
-
Initial launch
-
Download the jar file and copy into an empty folder
-
Double-click the jar file
Expected: Shows the GUI with a set of sample flashcards. The window size may not be optimum.
-
-
Saving window preferences
-
Resize the window to an optimum size. Move the window to a different location. Close the window.
-
Re-launch the app by double-clicking the jar file.
Expected: The most recent window size and location is retained.
-
H.2. Deleting a flashcard
-
Deleting a flashcard while all flashcards are listed
-
Prerequisites: Select a subject via the GUI or
selectSubjectcommand. -
Test case:
delete 1
Expected: First flashcard is deleted from the filtered list. Details of the deleted flashcard shown in the status message. Timestamp in the status bar is updated. -
Test case:
delete 0
Expected: No flashcard is deleted. Error details shown in the status message. Status bar remains the same. -
Other incorrect delete commands to try:
delete,delete x(where x is larger than the list size),delete a(where a is any alphabet)
Expected: Similar to previous.
-
H.3. Saving data
-
Dealing with missing/corrupted data files
-
{explain how to simulate a missing/corrupted file and the expected behavior}
-
{ more test cases … }